
PosiTector® App
Help Guide for
PosiTector Advanced Instruments
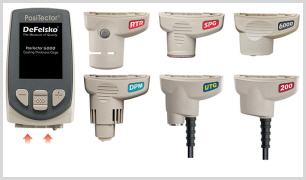
PosiTector Advanced gage bodies accept all 6000, 200, DPM, UTG, SPG and RTR probes. This help guide specifically covers using the PosiTector App to create customized, professional PDF reports, add images, notes and more.
The PosiTector App uses Bluetooth Smart wireless technology to communicate with the PosiTector Advanced. Your device must support Bluetooth Smart (also know as Bluetooth Low Energy, BLE or Bluetooth 4.0).
Screen fonts, brightness and displayed language are inherited from your smart device settings. Currently, the PosiTector App has language support for English, Spanish, French, German, Chinese and Korean. Screen orientation is fixed to portrait only, rotation to landscape is not supported.
Connecting to a PosiTector Advanced
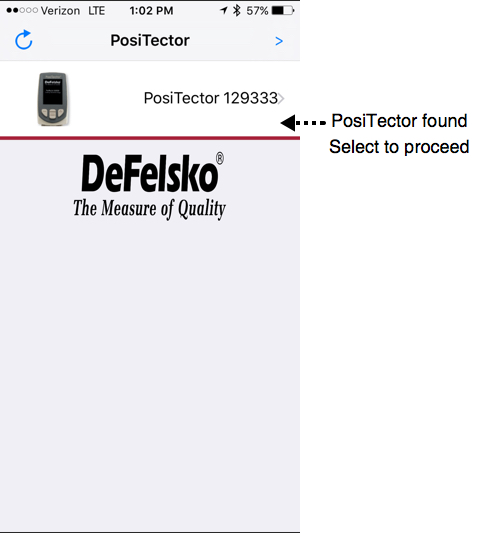
1. Ensure the PosiTector Advanced is powered-on and Bluetooth Smart is enabled (Bluetooth icon will be displayed).
2. Select the PosiTector App icon on your smart device.
3. A list of available instruments (listed by model and serial number) will be displayed. Select to connect. The Bluetooth icon on the PosiTector Advanced will illuminate solid blue when successfully connected.
The first time you connect to the PosiTector Advanced, you will have to open a batch by selecting Menu > Memory > Open (as shown below).
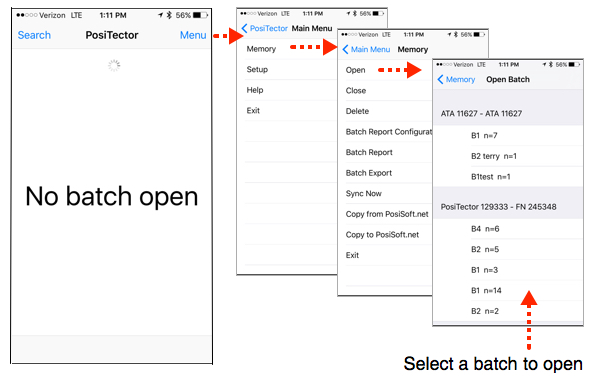
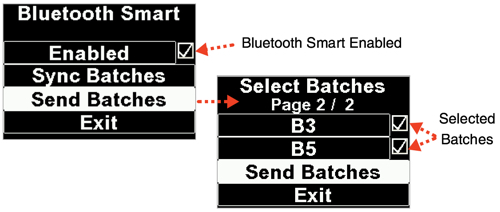
If no batches are present within the Open Batch menu, ensure Bluetooth Smart is enabled and select Send Batch from the PosiTector Advanced Connect menu. This option will manually transfer the measurement data the PosiTector App. This is typically only necessary when connecting for the first time.
Subsequent connections, stored batch readings and associated data will automatically be copied from the PosiTector Advanced to the PosiTector App (on your smart device) and the last opened batch will be displayed (if connected to the instrument). If the "No batch open" screen is displayed, open a batch by following the above instructions.
![]()
If the PosiTector App is uninstalled or a menu Reset is performed, all stored measurements and associated data is permanently erased.
Prior to uninstalling the PosiTector App or performing a Reset it is recommended that you synchronize/copy measurement data to PosiSoft.net, export to PosiSoft Desktop, or share the batch data (AirPrint or email report). This ensures that the data is saved for future reference.
User Interface
The user interface was designed to combine the proven simplicity of our instruments and the advanced functionality of a smart device's features including touch, swipe, keyboard, camera and more. The interface will be instantly recognizable to those familiar with our PosiTector series of instruments.
Main Navigation Bar
The Main Navigation section is dynamic and may change from one screen to another.
In the above example, Search and Menu navigation options are available.
Search returns back to the list of available instruments. Menu accesses the Main Menu
Connection Status Bar
Displays information about the connected instrument.
Measurement Area
Displays a list of readings for the opened batch.
Units
Displays measurement units for the opened batch.
Carousel
The carousel is displayed when more than a single view (screen) is present. The number of dots represent the number of available views. Swipe your finger horizontally across the screen to switch between views.
Tool Bar
Displays available actions. Add a batch or reading photo's and notes. Share the batch report or data.

PosiTector App functions are menu controlled. Access them by selecting Menu in the upper right of the PosiTector App display.

The Main Menu contains the following sub-menu's...
Help (this help document)
Select Exit to close the menu.
The PosiTector App uses your smart device's storage for storing copied measurement data. Measurements can be reviewed on-screen, printed (AirPrint), shared via email (PDF, CSV) or synchronized with cloud-based PosiSoft.net.
The following options appear within the Memory menu.
Open (open a previously copied batch)
Close (close the currently opened batch)
Delete (delete a batch or batches from the PosiTector App)
Batch Report (generate a report for single batch or batches)
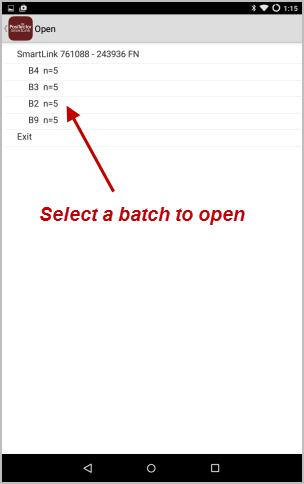
Open
Lists all available batches. Select the desired batch to open.
Batch Readings View
In the example below, the batch name is B1 and it contains atleast 7 readings. Scroll vertically to see additional readings.
If a batch note or image has been added a carousel will appear. Swipe your finger horizontally across the screen to switch between Batch readings and note.
Tool Bar
Displays available actions. Add a batch photo or note. Share the batch report or data.
![]() Add Photo
Add Photo
When selected, a menu appears with the following two options.
Batch Picture
Add a photo for the current batch (group) of readings.
Batch photos and Annotations can be included in reports (default) and synchronized with PosiSoft.net. The photo can be resized or hidden from reports within the Batch Report Configuration menu.
Reading Picture
Add a photo for the last displayed reading. See Add Reading Photo to add images to individual readings.
 Add Photo Annotation
This drawing tool is ideal for identifying a specific location or area within an image. Choose from three paint brush colors - Red, Green or Blue. Use finger or stylus to draw over the displayed image.
When selected, a menu appears with the following two options.
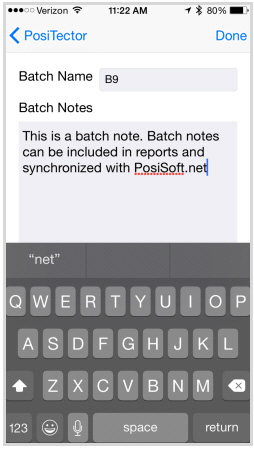
Batch Name/Note
Change the batch name and add batch notes using your smart device's keyboard or dictation (microphone) tools.
Reading Note
Add a note for the currently displayed reading. See Add Reading Note
![]()
Batch names/notes appear on reports and are included when measurement data is synchronized with PosiSoft.net.
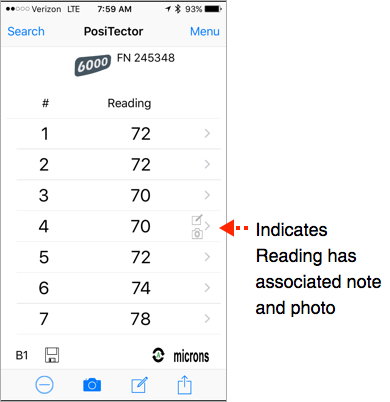
Batch Reading View
The Batch Summary view displays a list of all readings in the currently opened batch. In the following example, Batch 1 contains atleast 7 readings. Scroll vertically to see additional readings.
Select a reading to view its associated note and photo.
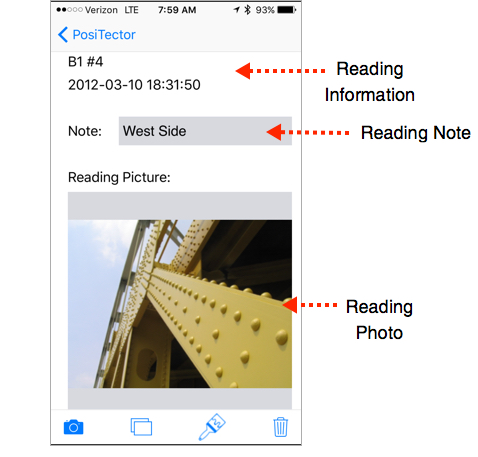
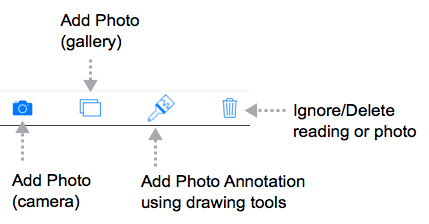
Reading Tool Bar
Add Reading Note
Click within the Note text box. A keyboard will display allowing you to enter the reading note. Click done to save the note and close the keyboard.
Adding Reading Photo
![]() Add a photo using the camera
Add a photo using the camera
 Add a photo using the gallery.
To delete a photo, select the  icon and then Delete Picture.
Reading Photos and Annotations can be included in reports (default) and synchronized with PosiSoft.net. The photo can be resized or hidden from reports within the Batch Report Configuration menu.
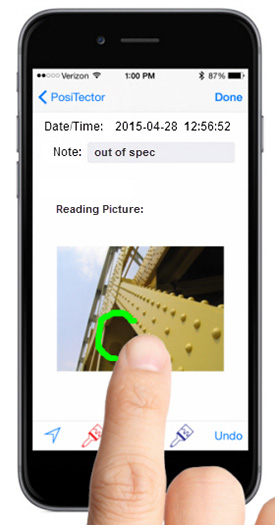
Add Photo Annotation
This drawing tool is ideal for identifying a specific location or area within an image. Choose from three paint brush colors - Red, Green or Blue. Use finger or stylus to draw over the displayed image.
Ignore Reading, Delete Note or Photo
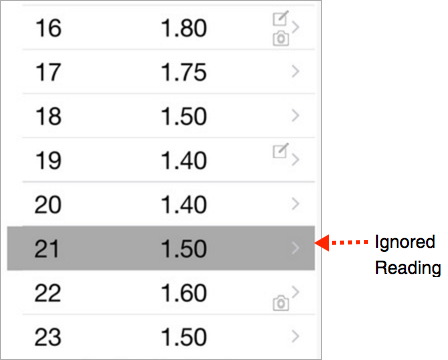
Ignore Reading
Select the icon and then Ignore Reading.
Ignore Readings are retained within the batch but are excluded from the report's statistical summaries and charts. Ignored readings are highlighted within the Batch Readings view. Ignored readings can be un-ignored by selecting the icon and then Un-Ignore Reading.
By default Ignored Readings are not included on reports. For inclusion, toggle the Hide Ignored Readings within the Batch Report Configuration. Ignored Readings will display has highlighted within the readings section of the report, but are excluded from the statistical summary and chart.
Delete Note
To delete a note, select the icon and then Delete Note.
Share/view professional PDF reports and data instantly via email, AirPrint, Dropbox or other applications on your smart device. Exported data includes .CSV (comma delimited value), .db (for export to PosiSoft Desktop v4) and a .json formatted file.
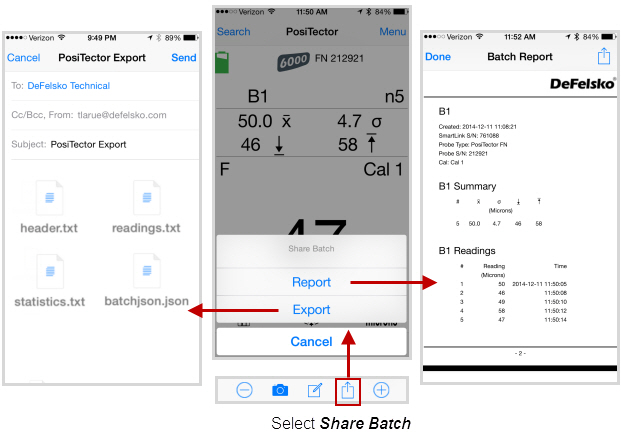
Generate professional PDF reports instantly and share via email, AirPrint, Dropbox or other applications on your smart device.
Batch reports can be customized within the Batch Report Configuration menu.
Export
Export comma-separated .txt text files which can easily be imported into supporting applications such as spreadsheets and databases. A .db (for importing into PosiSoft Desktop v4) and .json formatted file are also included. See Batch Export
Close Batch
Closes the current batch.
Batch measurement data is retained when a batch is closed.
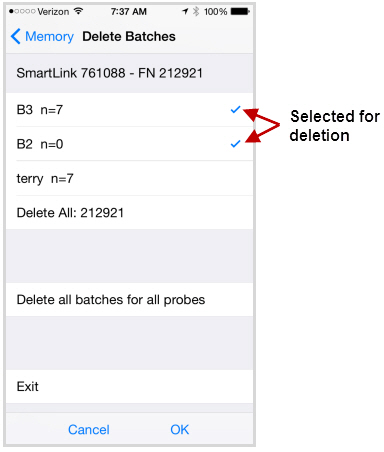
Delete Batch
Permanently remove a batch of readings from the PosiTector App. Does not delete the batch from the PosiTector Advanced instrument.
Select batches for deletion, then select OK. Or select Delete all batches for all probes to permanently delete all measurement data from the smart device (phone/tablet).
If the batches have been synchronized or copied to PosiSoft.net, a copy will remain there.
Batch Report Configuration
Customize reports using the Batch Report Configuration to include/exclude notes, images, logo, company/report name, fonts, alignment, image sizes and more.
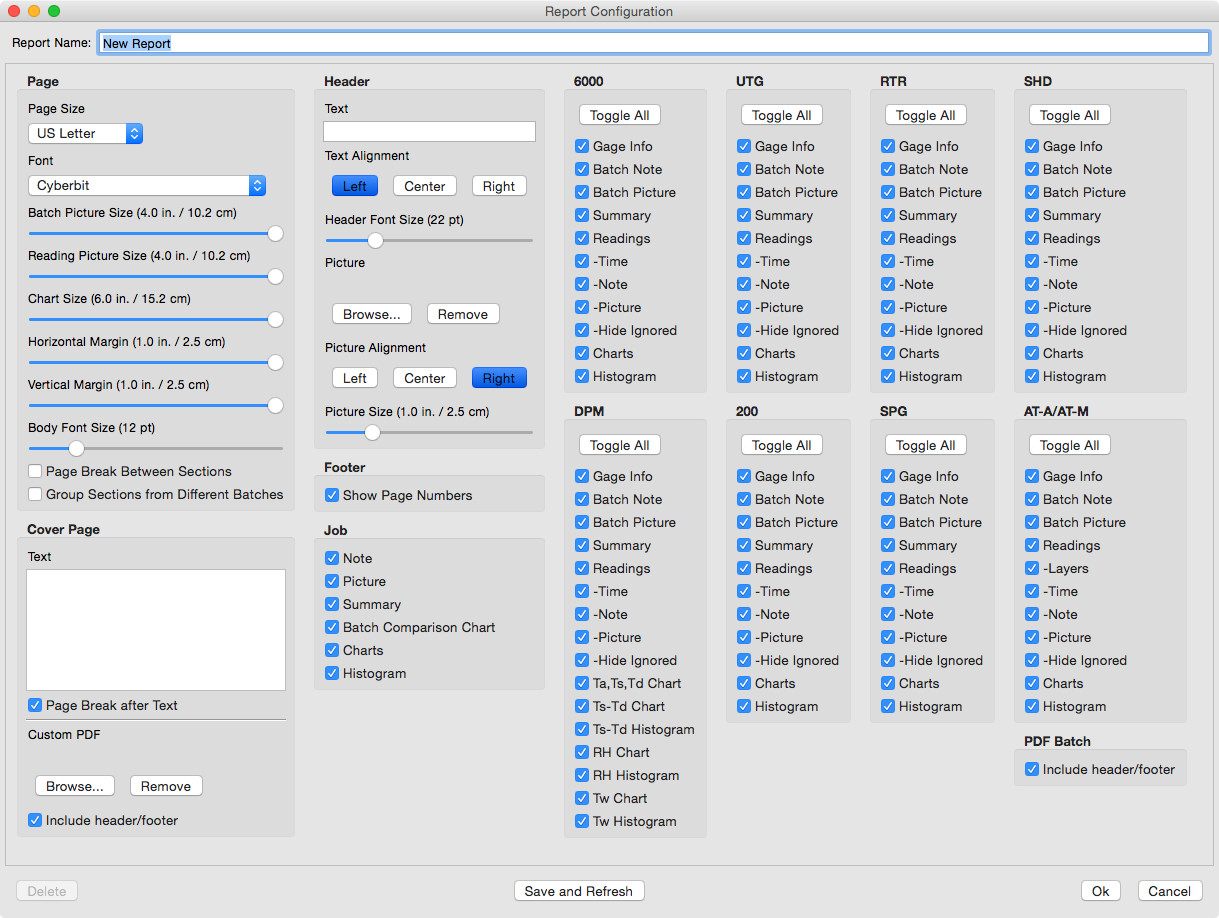
Your changes are saved automatically and will be reflected the next time you generate a report.
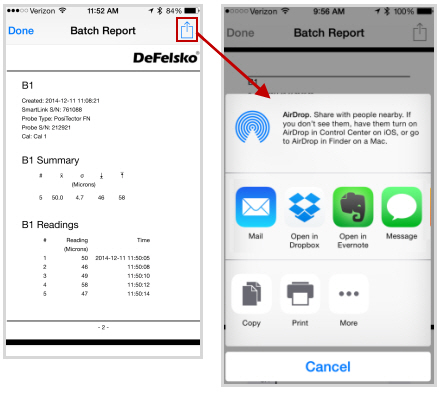
Batch Report
Generate a report summarizing an individual batch or multiple batches. Select desired batch or batches to include in the report and press OK.
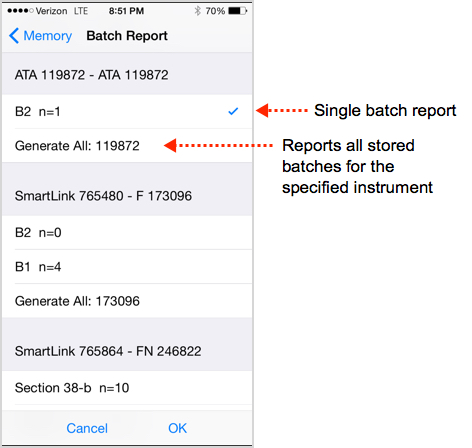
Share the report instantly via email, AirPrint, Dropbox or other applications on your device.
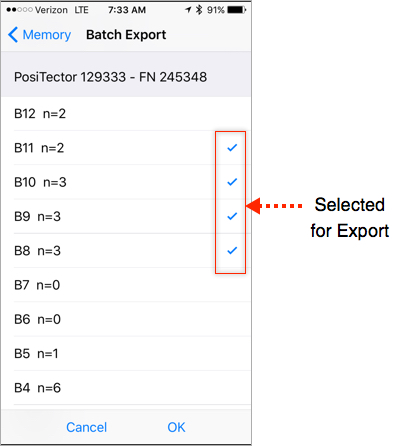
Batch Export
Export comma separated .txt text files which can easily be imported into supporting applications such as spreadsheets and databases. A .db (for importing into PosiSoft Desktop v4) and .json formatted file are also included.
Export Batches
Select desired batch or batches to include in the report and press OK.
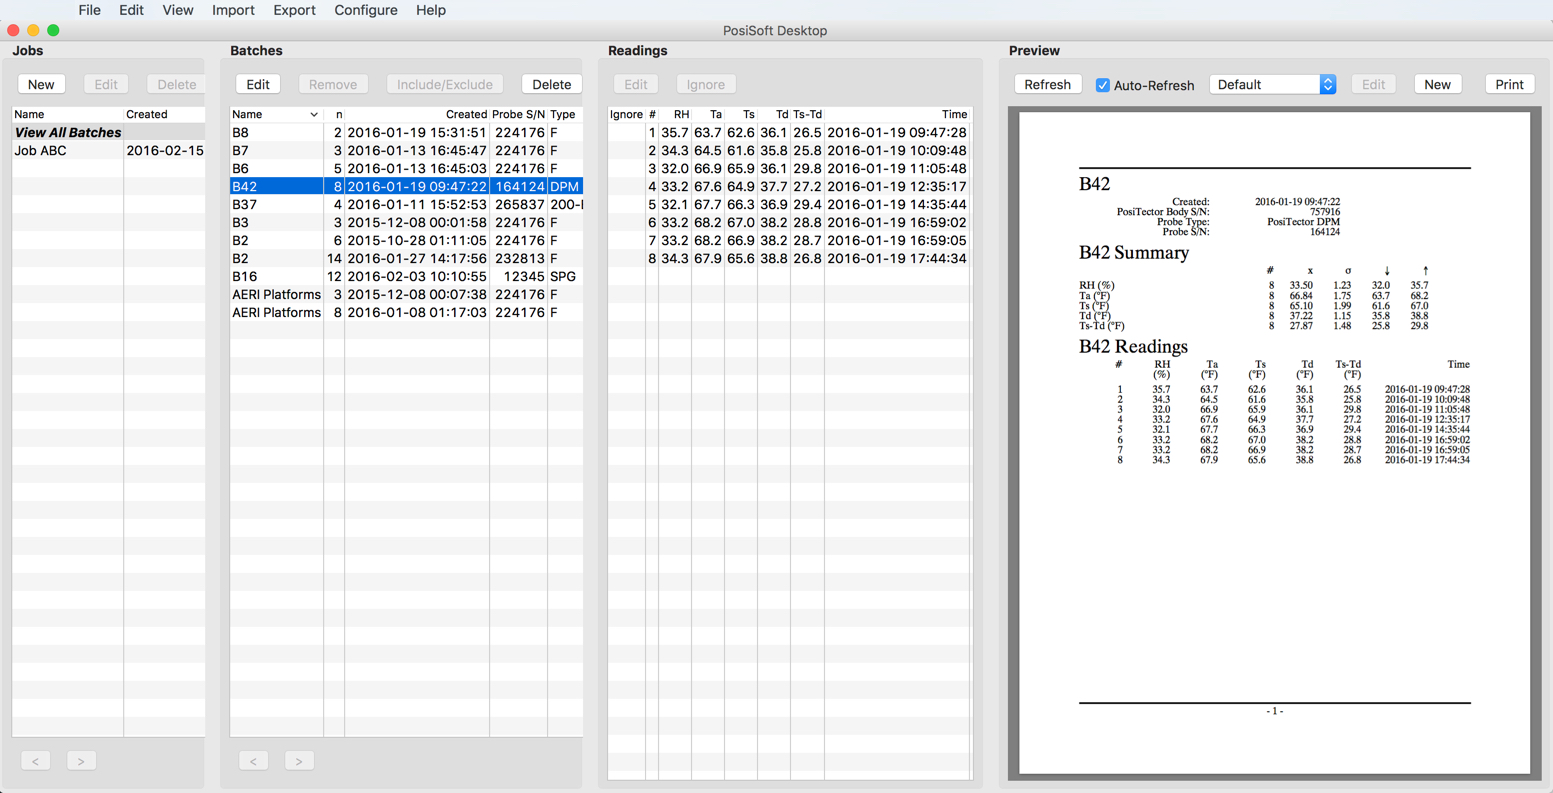
Import Batches into PosiSoft Desktop v4
Save the exported .db file to your local computer. Select Import -> from PosiTector App within the PosiSoft Desktop menu.
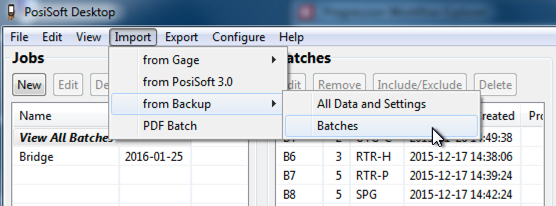
Navigate to the location of the .db file, select it and then click Open. The batch will be added within the View All Batches list.
See Synchronization section for details on...
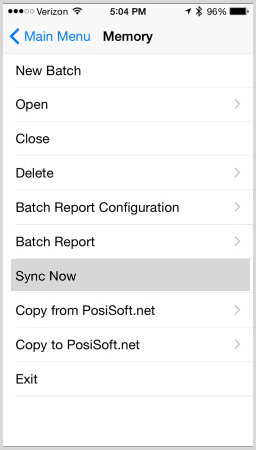
Sync Now
Copy to PosiSoft.net
Copy from PosiSoft.net
Info
Provides information about the currently connected instrument and PosiTector App version.
SmartLink Lock
Locks the PosiTector Advanced to the connected smart device. This prevents other PosiTector App users within range (10 m / 30 ft) from inadvertently connecting to PosiTector Advanced. This SmarLink Lock option is only visible when connected to the PosiTector Advanced.
Toggle the SmartLink Lock within the Setup menu to lock the PosiTector Advanced to a smart device. You will have to unlock it if you want to wirelessly connect to another smart device. Un-toggle to use the PosiTector Advanced with another smart device (default).
![]()
The PosiTector Advanced is not visible on other smart devices while you are connected (once you have selected the PosiTector Advanced from the Search screen).
Auto Sync
When toggled on; measurement data, images, nature of fracture and notes will automatically synchronize with PosiSoft.net. Synchronization occurs every time batch data changes (new reading, note, photo, etc.).
Sound
Toggles sound On/Off when taking measurements in HiLo mode using the PosiTector SmartLink.
Reset
Restores factory default settings.
Suggestion: It is recommended that you synchronize all stored measurement data to PosiSoft.net prior to performing a Reset. This provides a backup solution in case measurement data has been deleted in error. Data on PosiSoft.net is not affected by a Reset.
Select Reset from the Setup Menu. The following occurs after a warning message:
-All stored batches, measurement data, images, notes and annotations are deleted.
App Settings are returned to the following:
Auto Sync = OFF
Report Configuration Settings = restored to default
PosiSoft Desktop is a powerful free desktop software (PC/Mac) for downloading, viewing, printing and storing measurement data. No internet connection required.
Learn more about PosiSoft Desktop v4
PosiSoft.net is a free web-based application offering secure centralized management of measurement data. It is accessed using a standard internet browser from any location in the world.
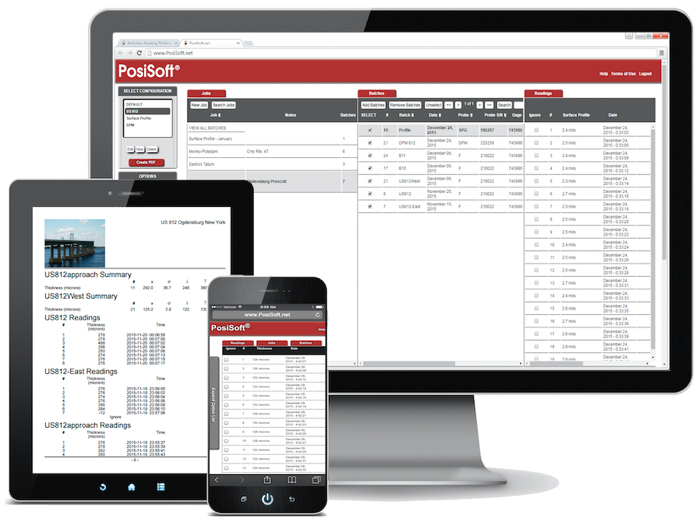
Learn more about PosiSoft.net
![]()
An account is not required to synchronize measurement data to PosiSoft.net.
Synchronize (Sync) with PosiSoft.net
Synchronizing copies all batch data from the PosiTector App to PosiSoft.net (no registration required). WiFi/cellular internet data connection required.
Stored batch data including measurements, photos, notes and annotations are included in the synchronization. After synchronization, data on the PosiTector App and PosiSoft.net will match (be the same).
With the exception of Batch names, information added on PosiSoft.net (notes, images) will not synchronize back to the PosiTector App. However, any changes or additions to the batch data on the PosiTector App will transfer to PosiSoft.net during the next synchronization.
Tip: Prior to synchronizing, it is good practice to change batch names to something more meaningful. This helps identify the batch in the future. Example: Rename "B4" to "Job142-14" or "Section83".
Synchronization can be triggered either manually (Sync Now) or automatically when batch data changes (Auto Sync).
Sync Now (Memory Menu)
Immediately initiates synchronization. All batches, readings, photos, notes and batch names contained within the PosiTector App will be synchronized. If the batches already exist on PosiSoft.net (previously synchronized), only the changes since the last synchronization will be included. In such a case, any batch/reading notes or images that were added on PosiSoft.net will not be overwritten.
A green sync icon indicates successful communication with PosiSoft.net. A red sync icon will appear if communication is not successful. If successful communication is not established after a period of time, the app will stop trying and the red icon will disappear. Ensure that your smart device has an internet/cellular data connection.
Auto Sync is an ideal backup solution for your measurement data. Data can be copied back to the PosiTector App on the same smart device or another (ideal for switching between smart devices).
To view/interact with synchronized data on PosiSoft.net, registration of your PosiTector SmartLink is required (free account).
To transfer all stored batches, select Sync Now.
Copy To/From PosiSoft.net (Memory Menu)
Sync Now synchronizes all batch data for all instruments associated with the PosiTector App. Sometimes only a single batch or select batches is desired for transfer. Copy to or Copy from PosiSoft.net allows the selection of single or multiple batches for transfer. Ideal solution for switching between smart devices (phone and tablet). Pickup exactly where you left off.
Copy to PosiSoft.net
Select an individual batch or batches to copy to PosiSoft.net. Ideal when you don't require transferring or synchronizing all stored batches. All data for selected batches will be copied to PosiSoft.net. If the batches already exist on PosiSoft.net, they will be overwritten.
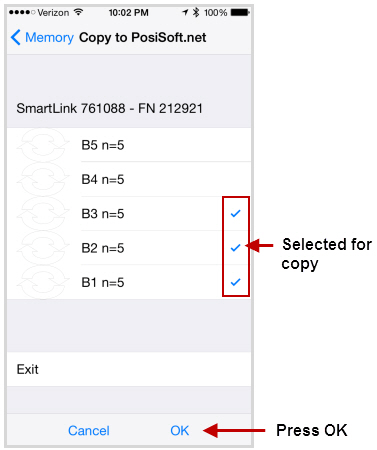
The selected batches will be copied to PosiSoft.net and you will be returned back to the main measurement screen.
If the batches already exist on PosiSoft.net you will be prompted with an overwrite warning message.
"At least one of the batches you selected already exists on PosiSoft.net. Press OK to overwrite existing batches. Pressing Cancel will not copy the batches"
If OK is pressed, the existing batch on PosiSoft.net will be overwritten. This action cannot be un-done.
The copied batches will be identified with a ![]() symbol within the Copy to PosiSoft.net view.
symbol within the Copy to PosiSoft.net view.
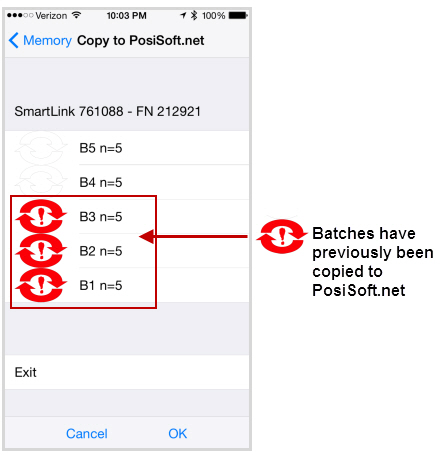
The ![]() means that the batch has been previously copied. It is not an indication that batch data is in sync. If additional measurements have been taken or batch data has changed, select Sync Now to ensure that data is in sync between the smart device and PosiSoft.net.
means that the batch has been previously copied. It is not an indication that batch data is in sync. If additional measurements have been taken or batch data has changed, select Sync Now to ensure that data is in sync between the smart device and PosiSoft.net.
Copy from PosiSoft.net
Select an individual batch or batches to copy from PosiSoft.net to your local PosiTector App.
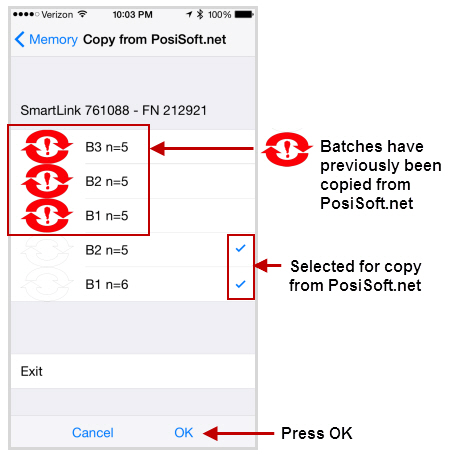
The ![]() means that the batch has been previously copied or originated on the connected device. It is not an indication that batch data is in sync. If additional measurements have been taken or batch data has changed, select Sync Now to ensure that data is in sync between the smart device and PosiSoft.net.
means that the batch has been previously copied or originated on the connected device. It is not an indication that batch data is in sync. If additional measurements have been taken or batch data has changed, select Sync Now to ensure that data is in sync between the smart device and PosiSoft.net.
![]()
You must have connected the PosiTector App to the instrument previously to be able Copy To or From PosiSoft.net. This initial connection associates the PosiTector App with the unique identifiers (serial number and key) stored within the PosiTector SmartLink. For security purposes, this information is required for the PosiTector App to communicate with PosiSoft.net. The PosiTector App will retain this association for all connected instruments until a Reset has been performed.
Once associated, you can Copy To and From PosiSoft.net with or without the associated instrument connected.
Using the PosiTector Advanced with multiple Smart Devices
The PosiTector Advanced can be used with multiple smart devices, but only one device connection is possible at any given time. Ensure the PosiTector SmartLink is disconnected from the original smart device (close the PosiTector App or return to the Search screen). Connect the new smart device to the PosiTector Advanced.
Any new readings willl automatically be transferred to the PosiTector App (when connected). PosiTector Advanced batches that were previously copied to another smart device will not be present when connecting to a different smart device. If required, these batches can be manually copied or sent to the PosiTector App.
Batch data can be transfered between devices using the Copy to and Copy from PosiSoft.net features. Alternatively, any measurements remaining in the PosiTector Advanced's memory can be copied to the PosiTector App. Select Send Batch from the PosiTector Advanced's Connect > Bluetooth Smart menu. Select the desired batches and then Send Batch. The PosiTector App must be connected to the PosiTector Advanced for transfer.
The chosen batches will be copied from PosiSoft.net to your smart device. Open a batch by selecting Open Batch from the Memory menu.
![]()
SmartLink Lock must be off for other devices to be able to connect to the PosiTector SmartLink. Ensure this is off prior to switching smart devices.
PosiTector Advanced not displaying on search screen.
Ensure PosiTector Advanced is powered-up and is within range.
Refresh the search using the arrow icon in the upper left of the display.
Verify Bluetooth Smart is Enabled in the instruments Connect settings.
Synchronization with PosiSoft.net not successful
Ensure WiFi or cellular internet connection is available and retry.
Camera does not function when attempting to add photo
Verify adequate privacy permissions are set for the PosiTector App.
Limited Warranty, Sole Remedy and Limited Liability
DeFelsko's sole warranty, remedy, and liability are the express limited warranty, remedy, and limited liability that are set forth on its website: www.defelsko.com/terms
![]()
This manual is copyrighted with all rights reserved and may not be reproduced or transmitted, in whole or part, by any means, without written permission from DeFelsko Corporation.
DeFelsko, PosiTest and PosiTector are trademarks of DeFelsko Corporation registered in the U.S. and in other countries. iTunes and AirPrint are trademarks of Apple Inc., registered in U.S. and other countries. Other brand or product names are trademarks or registered trademarks of their respective holders.
Every effort has been made to ensure that the information in this manual is accurate. DeFelsko is not responsible for printing or clerical errors.
This device complies with part 15 of the FCC Rules. Operation is subject to the following two conditions: (1) This device may not cause harmful interference, and (2) this device must accept any interference received, including interference that may cause undesired operation.

