
Getting Started with PosiSoft Desktop
PosiSoft Desktop stores measurement data on your PC/Mac for viewing, sharing, analyzing and reporting. Jobs, batches, readings, notes and pictures can be setup to automatically synchronize with PosiSoft.net and shared between any internet connected device (desktop, notebook and smart device). Ideal for users with multiple physical locations or computers/devices.
Compatible with:
- PosiTector Standard and Advanced gage (serial numbers 700,000 and greater)
- PosiTest AT-A (automatic) and AT-M (manual) pull-off adhesion tester- PosiTest PC Powder Checker
- PosiTest OTL Oven Temperature Logger
- PosiTest CMM Concrete Moisture Meter
Screen captures have been taken using both Apple Mac and MS Windows screens.
For the most up-to-date version of this guide, see our online help documentation.
Import Batches from your Gage via USB
Connect your gage to a computer using the supplied USB cable.

PosiTector Standard/Advanced & PosiTest AT-A (with color touch display): Ensure USB Drive is enabled (checked) within the Connect menu.
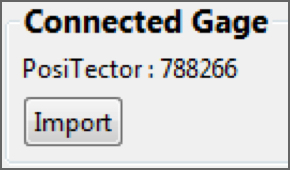
When successfully connected, a Connected Gage dialog box will appear as shown below. Select Import to copy batches from the gage into PosiSoft. Alternatively, select Import > from Gage and select your connected gage to initiate the transfer. Imported batches will display within the Jobs & Batches section.
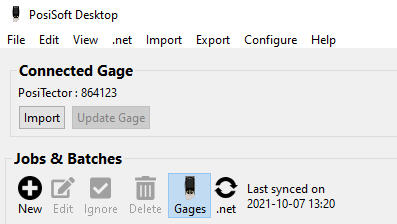
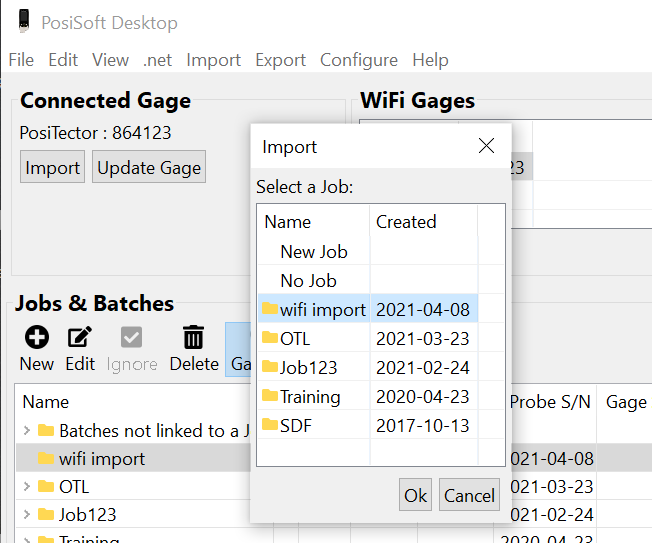
A dialog box will appear to allow newly imported batches to be associated with a job. Select an existing Job, create a New Job or select No Job to include the batches in the Batches not linked to a Job section.
The time it takes for import will depend on the number of Batches and measurements present within the gage. Imports generally take no longer than a few seconds.Batches are not erased from gage memory during import. They will remain on the gage until deleted by the user or a gage reset is performed.
Imported batches will automatically synchronize with PosiSoft.net if the gage is registered and Auto Sync is enabled. See Synchronization with PosiSoft.net for more information.
For additional import options, see Import
Import Batches from your Gage via WiFi
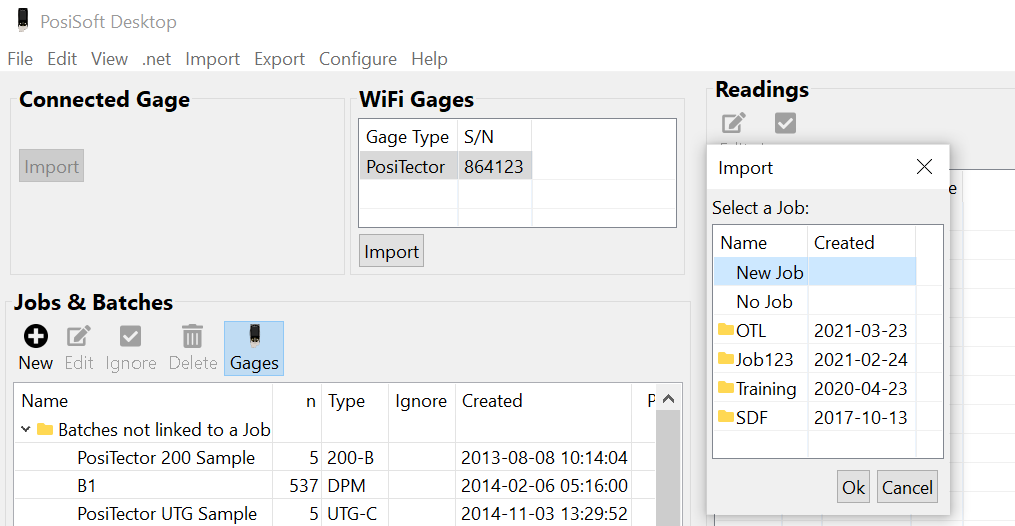
Step 1: Connect your gage (PosiTector Advanced & PosiTest AT-A models only) and computer to a common WiFi network.
Step 2: Locate the gage serial number in the WiFi Gages dialog box. Select the gage and click Import.
Step 3: Select the location for the import in the Import dialog box.
Synchronization with PosiSoft.net
Connect PosiSoft Desktop with your PosiSoft.net account to take advantage of the free cloud-based application offering secure storage of PosiTector and PosiTest inspection instrument data.PosiSoft.net Features
- - Securely backup data for all of your jobs, batches, readings and report templates
- - Synchronize measurement data from your instrument to and from PosiSoft.net
- - Share Data with other authorized users and multiple copies of PosiSoft Desktop Software
- - Review Data from any web connected device
Backup all measurement data
- Batches
- Readings
- Report Templates
- Notes
- Images
Jobs, Batches, Readings and Report Templates uploaded to the PosiSoft.net cloud server will be downloaded automatically on any instance of PosiSoft Desktop signed in to that username. Any gage registered to PosiSoft.net will be automatically added to the gage registry of other instances of PosiSoft Desktop signed in to the same PosiSoft.net user profile. A gage can be registered to multiple instances of PosiSoft Desktop. For users with multiple locations, this is a simple way to share measurement data with colleagues and supervisors.
Navigate to PosiSoft.net in any web browser to register for free account.

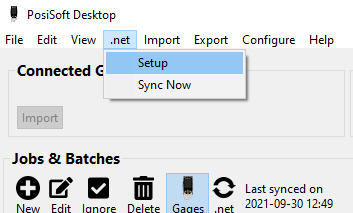
Once you've created an account, enter your Username and Password into the Account to Sync with .net section in PosiSoft Desktop to login.
 Register Gage
Register a gage to sync with PosiSoft.net

Enter the Gage S/N and Gage Key found within the gage Setup > Gage Info menu, then click Register. For PosiTest instruments without a Gage Key, connect by USB and select Generate key and register PosiTest.

Instruments must be registered to synchronize data with PosiSoft.net. Enter your Gage serial number and unique key as displayed on your gage within Setup-> Gage Info menu. Press Register.
PosiTest gages without a key (PosiTest OTL, PosiTest CMM) can be registered if you have a PosiSoft.net account by plugging the gage into a USB port on the computer running PosiSoft Desktop then clicking Generate key and register PosiTest.
Once registered, the gage serial number and key will appear in Registered Gages list.
NOTE: If Enable Auto Sync with PosiSoft.net is checked, all batches related to the gage will synchronize automatically with PosiSoft.net.
Unregisters the selected gage from synchronizing with PosiSoft.net. This action will not remove batches from PosiSoft Desktop.
When Enable Auto Sync with PosiSoft.net is checked, all batches for registered gages will synchronize automatically with PosiSoft.net.
Manual Synchronization
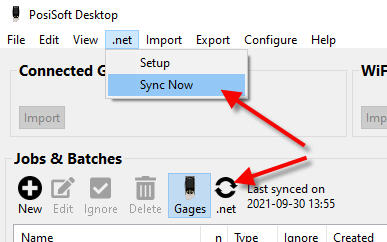
Select Sync Now. A manual synchronization is required when batches are synchronized using another device or directly from a gage using a WiFi connection.
The time it takes to synchronize will depend on the number of Batches
and measurements present within the gage and internet connection
speed. The sync symbol ![]() will remain on the display until synchronization is
complete. If a "triangle with an exclamation point" displays on the
gage, the PosiTector was unable to communicate with PosiSoft.net.
Ensure the computer you are connecting to has internet access and
retry.
will remain on the display until synchronization is
complete. If a "triangle with an exclamation point" displays on the
gage, the PosiTector was unable to communicate with PosiSoft.net.
Ensure the computer you are connecting to has internet access and
retry.
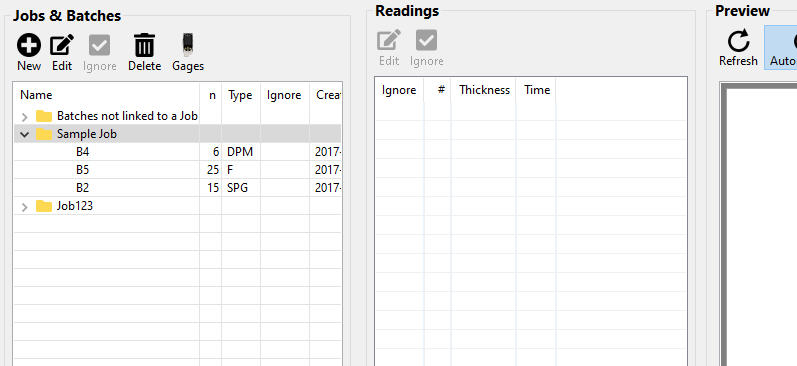
The PosiSoft Desktop interface consists of a main application menu and 4 sections (Connected Gage, Jobs & Batches, Readings and Preview).
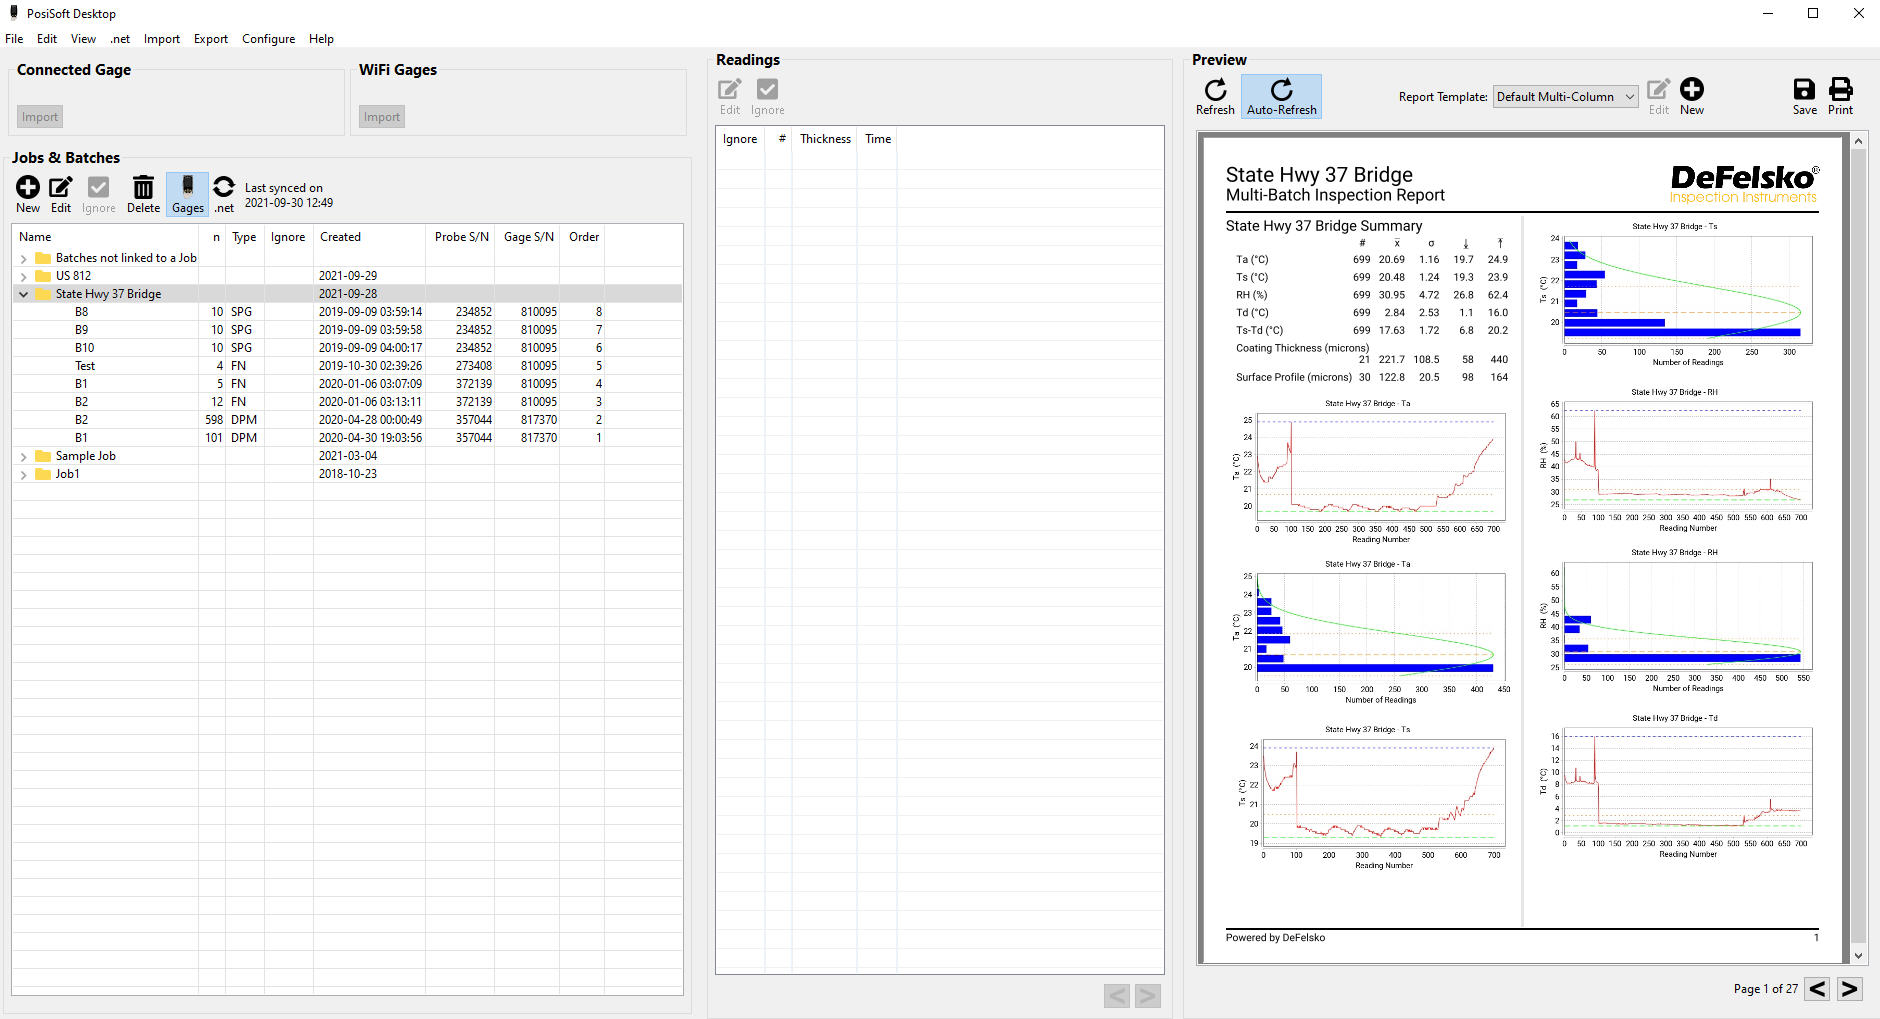
Connected Gage
Select Import to copy batches from the connected gage into PosiSoft Desktop. See Import
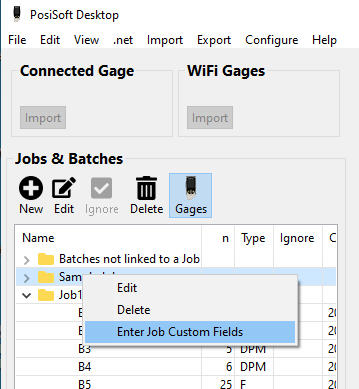
Jobs & Batches
Jobs allow organization of one or more batches into a group. Jobs can include batches from multiple instruments and probe types. Double click on a job to display and edit its attributes (rename the job, add a picture and note, edit custom fields, add or remove batches).
Select
to create a Job. See: Jobs
Select a batch to view a list of its contained readings. Double click on a batch to display and edit its attributes (rename the batch, add a picture and note, edit custom fields). See: Batches
Readings
Displays a list of readings contained within the currently selected batch. Double click on a reading to display and edit its attributes (add a picture and note, ignore the reading). See: Readings
Preview
Displays a preview of the report. Selected Jobs/Batches are displayed using the selected report template. See: Preview
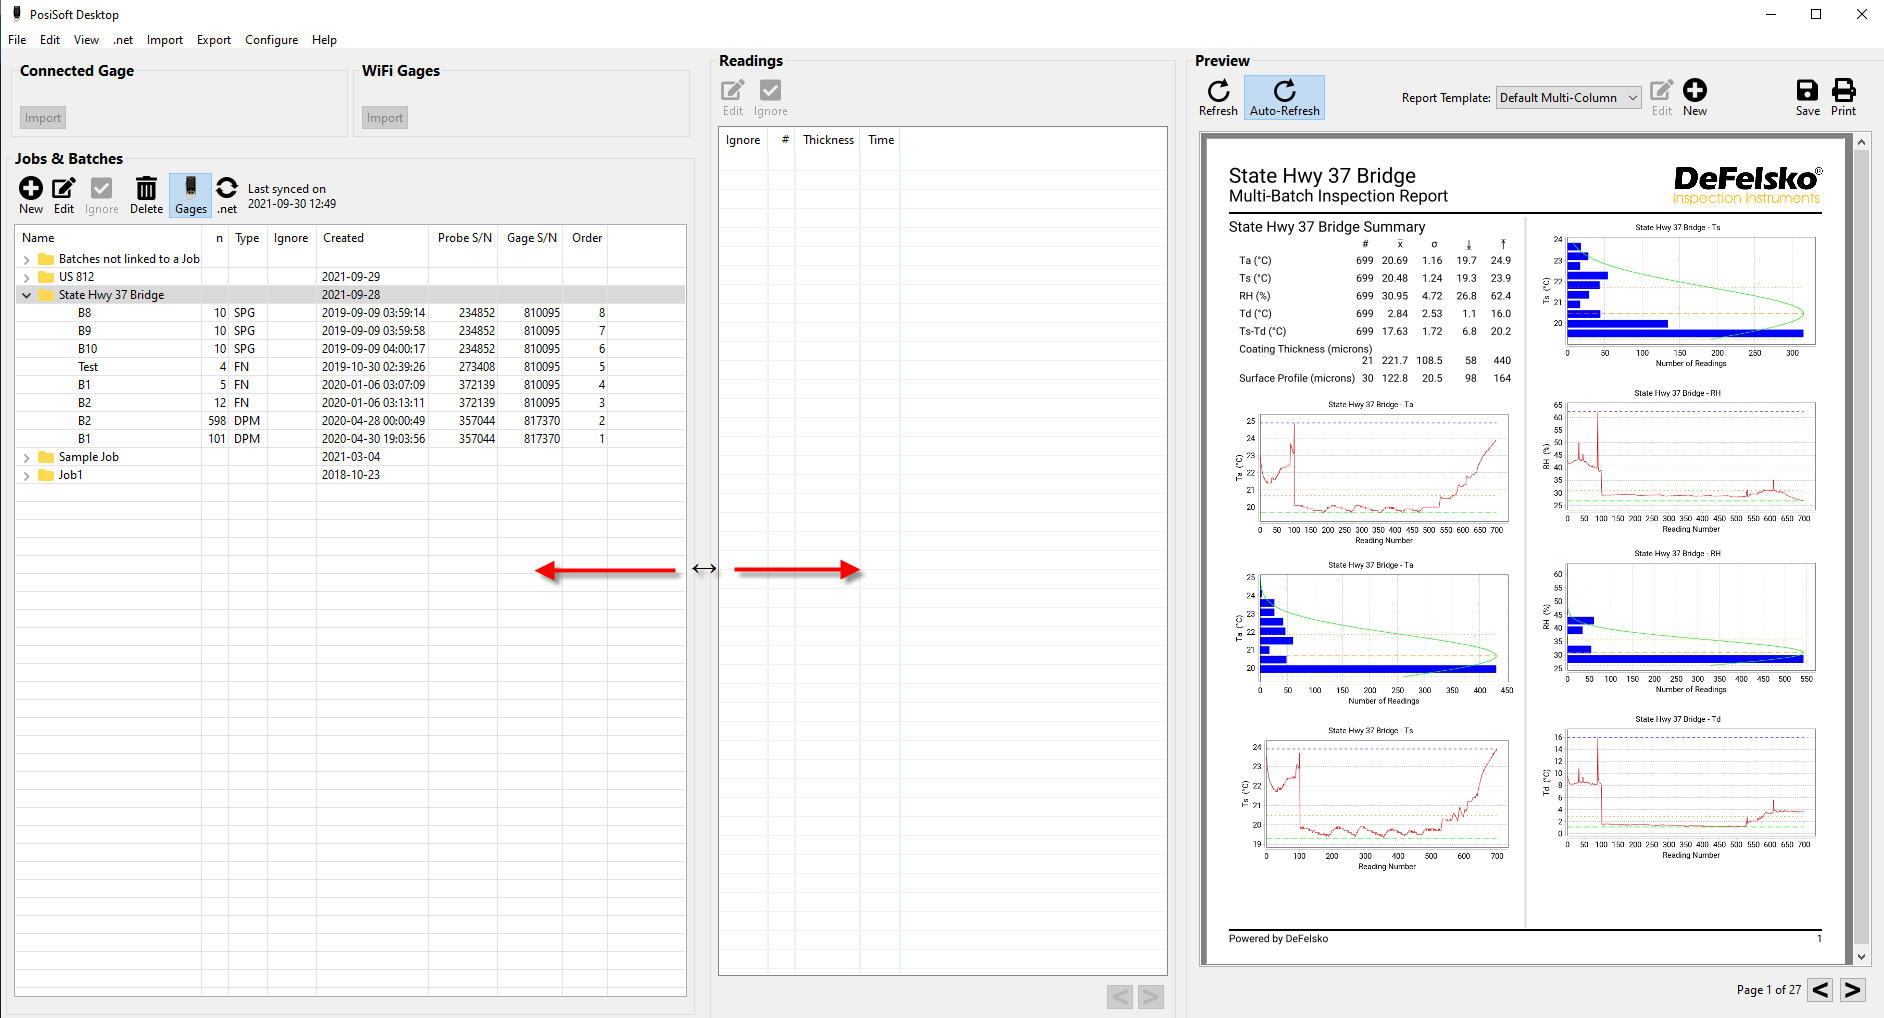
Resize
Sections
Sections can be resized by dragging the vertical
borders separating the views. When the pointer is placed between the
vertical border, the pointer will display as ![]() . Hold the mouse button down and
drag the border horizontally. Alternatively, select “Expand"
from the "View” menu to expand each section.
. Hold the mouse button down and
drag the border horizontally. Alternatively, select “Expand"
from the "View” menu to expand each section.
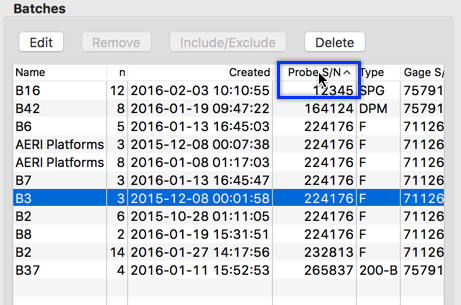
Sort
Column (Lists)
Section lists can be sorted by clicking on the column titles
(as shown below).
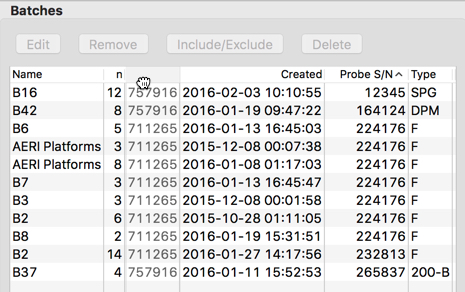
Reorder
Columns
The order columns are presented can be
rearranged by selecting the column title and dragging it. When
selected, the pointer will display as a hand ![]() icon (Mac) or a pointer (Windows).
The order of the columns is a visual preference and does not alter the
way reports are displayed or printed.
icon (Mac) or a pointer (Windows).
The order of the columns is a visual preference and does not alter the
way reports are displayed or printed.
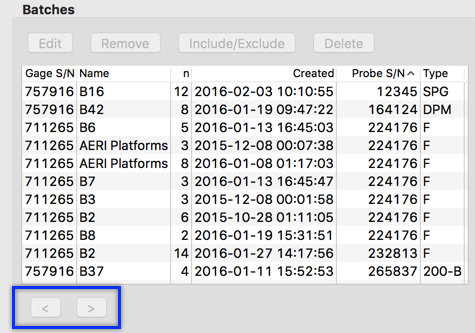
When the number of rows exceeds the allowable limit,
the data will be spit into multiple pages. Use the ![]() and
and ![]() buttons to navigate between pages.
buttons to navigate between pages.
Jobs  allow
organization of one or more batches into a single group. Jobs
can include batches from multiple instruments and probe types. Select a
Job to display its contained batches. Only a single Job can be
displayed at a time.
allow
organization of one or more batches into a single group. Jobs
can include batches from multiple instruments and probe types. Select a
Job to display its contained batches. Only a single Job can be
displayed at a time.

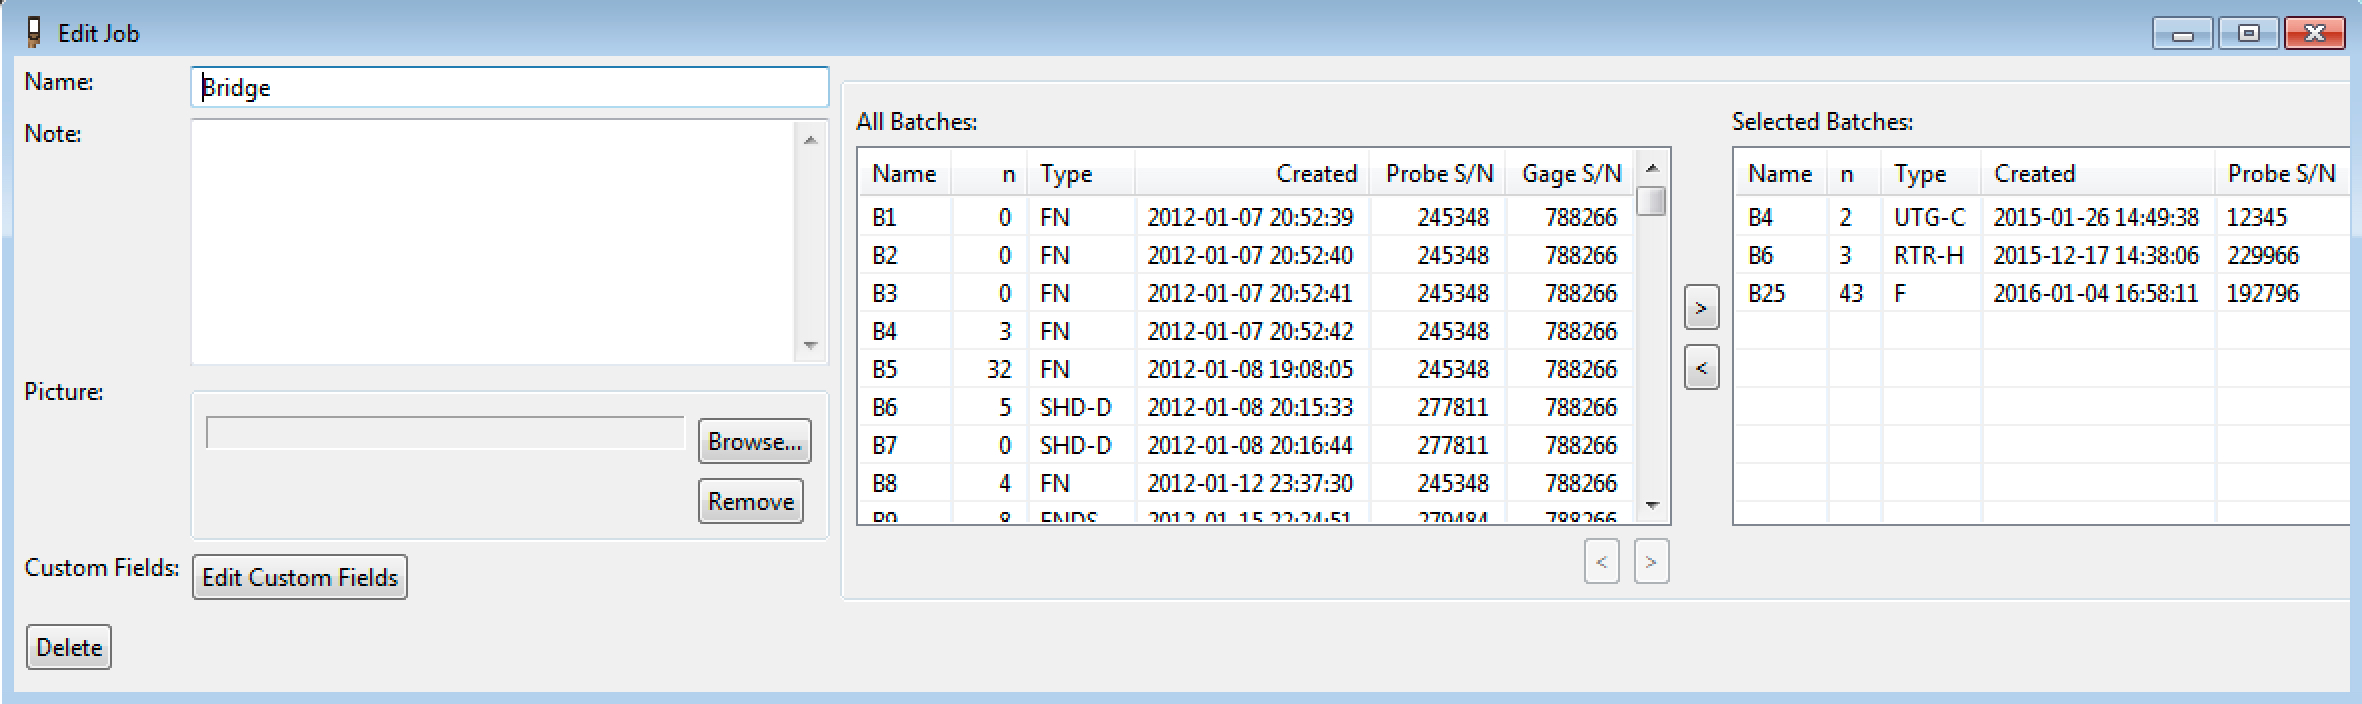
Batches not linked to a Job: Lists all batches that have been imported into PosiSoft Desktop but not assigned to a Job.
Use the
button to create a new Job.

Highlight batches in the Batches not linked to a job table (hold the Shift or Ctrl keys) to select multiple batches.
Press the
button to add the highlighted batches to the Selected Batches list. The highlighted batches will be removed from the Batches not linked to a Job list. Batches can be associated with multiple Jobs.
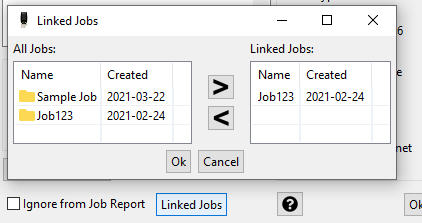
To add a batch that's already associated with a different Job, select
To remove Batches from the Selected Batches list, highlight them and press the
button.
Name: Enter a name for the Job
Note: Add descriptive details relating to the Job. Job notes are displayed at the beginning of the report or after the cover text/page (if included).
Picture: Include an image for the Job.
Job Notes and Pictures are displayed at the beginning of the report or after the cover text/page (if included).
When finished, click
to save the Job or
to close the Edit Job window without saving.
The new Job will be displayed within the Jobs & Batches list.
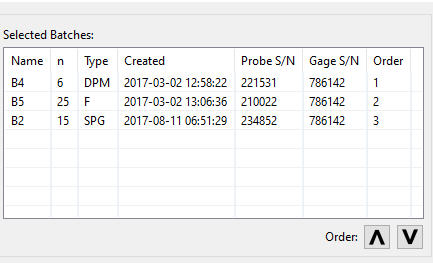
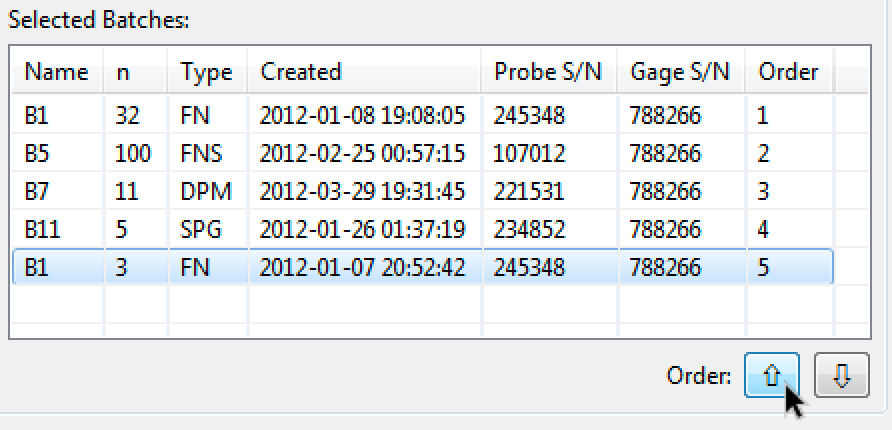
Reorder Batches within a Job: Select the order in which batches display within generated reports.
Select a batch and use the
buttons to reorder. When finished,click
Reorder Columns
The order columns are presented can be rearranged by selecting the column title and dragging it. When selected, the pointer will display as a handicon (Mac) or pointer icon (Windows). The order of the columns is a visual preference and does not alter the way reports are displayed or printed.

Modify the selected Job by clicking the
button. Alternatively, double click the Name in the Jobs & Batches list.
Name: Alter the name for the Job to something more meaningful
Note: Add descriptive text for the selected Job
Picture: Include a Job picture. Click Browse and navigate to the picture you would like to include.
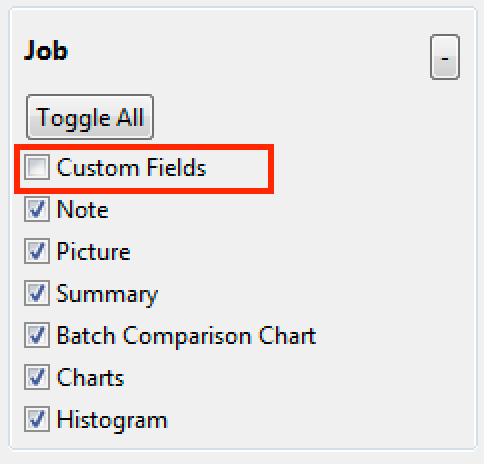
By default, Job images and notes are displayed on reports. To exclude them, uncheck Note and Picture within the Job group located in the Report Configuration.
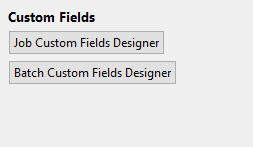
Custom Fields: Select to enter information into user-created Custom Fields for the selected Job. See Custom Fields
Remove the selected Job by clicking the
button. Alternatively, select
from within the "Edit Job" window.
To add a Job picture, double click on a Job to display its attributes.
Select Browse from within the Picture box, navigate to and select the desired image. Click Open. The picture will display within the Edit Job window.
By default, a Job image will be included in generated reports. To exclude, uncheck Picture from the Job group within the Report Configuration.
Batches are stored in one or more jobs.
Lists all batches that have been imported into PosiSoft Desktop but not assigned to one or more Jobs.
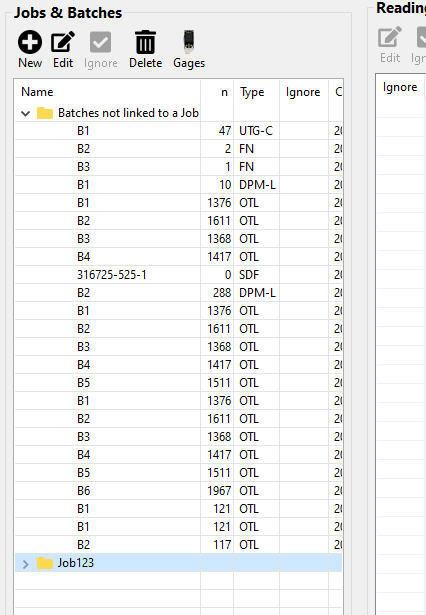
Select a Job to display its contained batches. Only a single Job can be selected at a time.
By default, all associated batches within a Job are included in the PDF report when the Job is selected. Batches can be removed from the current Job or permanently deleted.
Buttons
Remove selected batch(es) from currently selected Job.
A check mark
indicates the batch will be excluded from the Job report. Click the Ignore button to toggle between Include and Exclude.
Prompt PosiSoft Desktop to sync with PosiSoft.net cloud server.
Column List
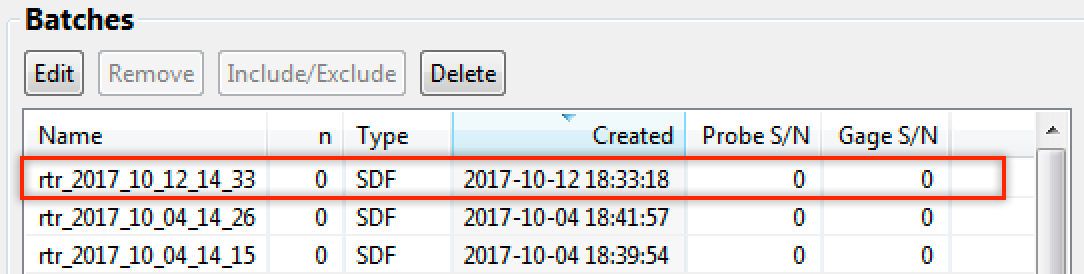
Name: Displays the batch name. Double click or select the Edit button to rename the batch.
Gages automatically generate the Batch name as B1, B2, etc. for multiple batches. Batch names can be altered to something more meaningful by double clicking on the Batch or selecting the Edit button. Alternatively, PosiTector Advanced and PosiTest AT-A users can change the batch name directly from the menu on the gage.
n: Displays the number of readings contained in a Batch
Created: Displays the date/time stamp when the Batch was created
Probe S/N: Serial Number of the PosiTector probe used for associated readings
Type: The model of the PosiTector probe or PosiTest instrument
Gage S/N: Serial number of the PosiTector body or PosiTest instrument
Order: Displays the Batch Sort Order for displaying in reports
Reorder Columns
The order columns are presented can be rearranged by selecting the column title and dragging it. When selected, the pointer will display as a hand
Double click on a Batch or select the Edit button to display the Edit Batch window.
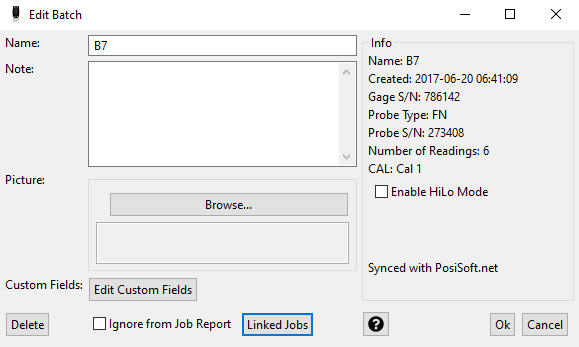
Name: Alter the name for the Batch to something more meaningful
Note: Add descriptive text for the selected Batch
Picture: Include a Batch Picture. Click Browse and navigate to the picture you would like to include.
By default, reading images and notes are displayed on reports. To exclude them, uncheck Note and Picture for the associated instrument type within the Report Configuration.
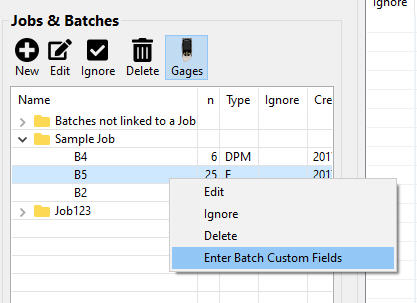
Custom Fields: Select to enter information into user-created Custom Fields for the selected Batch. See Custom Fields
Ignore from Job Report: When checked, the batch is excluded from the Job report.
Info: Displays the date and time the reading was taken/stored into the instruments memory and its value. PosiTest AT-A models also display editable nature of fracture layer information.
Linked Jobs: Shows all Jobs that the batch is currently linked to and allows the user to link to any existing Job.
2D and 3D Parameters: (PosiTector RTR 3D Advanced models only). A total of six parameters can be selected for inclusion in batch reports.
Batch Synchronization with PosiSoft.net
Not synchronized with PosiSoft.net: Batch has not been synchronized with PosiSoft.net
Synced with PosiSoft.net: Batch has been previously synchronized with PosiSoft.net
See Synchronization with PosiSoft.net for more information.
Click
Multiple pictures can be added to each batch.
To add a picture, double click on a Batch to display its attributes.
Select Browse from within the Picture box, navigate to and select the desired image. Click Open. The picture will display within the Edit Batch window. Repeat to include additional pictures.
By default, batch images will be included in generated reports. To exclude, uncheck Batch Picture from the associated probe type from within the Report Configuration.
Displays all readings present within the selected batch or batches. Below is an example of PosiTector 6000 readings with sub-batches.

Column List
Ignore: A check mark
#: Reading number
Thickness: In the above PosiTector 6000 example, the displayed title represents Thickness. This columns title will be different for each instrument or probe type . For example a PosiTector DPM will display multiple parameters (columns): RH, Ta, Ts, Td and Ts-Td. A PosiTector 200 could display up to 3 individual layer thicknesses.
Time: Displays the date/time stamp when the reading was stored on the gage.
Sub-Batch: Some gage models offer sub-batching. This column is only displayed when sub-batches are present. The example above contains 3 sub-batches, each containing 4 readings.
Reorder columns
The order columns are presented can be rearranged by selecting the column title and dragging it. The order of the columns is a visual preference and does not alter the way reports are displayed or printed.
Double click on a reading or the Edit button to display the Edit Reading window.
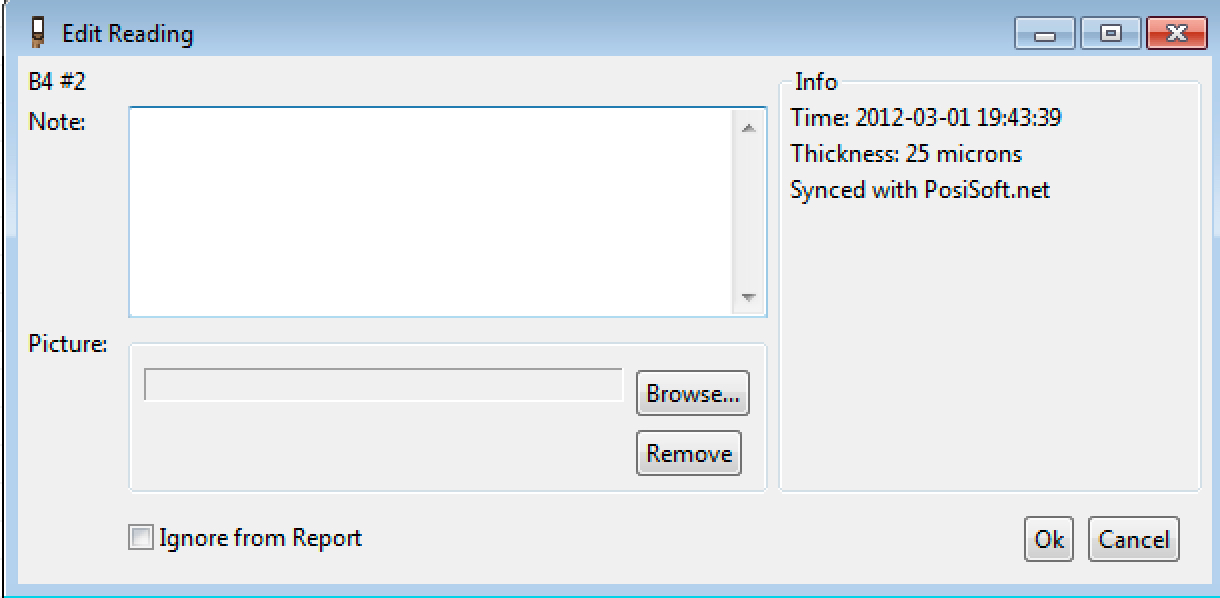
Note: Add descriptive text for the selected Reading
Picture: Include a Reading Picture. Click Browse and navigate to the picture you would like to include.
By default, reading images and notes are displayed on reports. To exclude them, uncheck Note and Picture for the associated instrument type within the Report Configuration.
Info: Displays the date and time the reading was taken/stored into the instruments memory and its value. PosiTest AT-A models also display editable nature of fracture layer information.
Batch Synchronization with PosiSoft.net
Not synchronized with PosiSoft.net: Batch has not been synchronized with PosiSoft.net
Synced with PosiSoft.net: Batch has been previously synchronized with PosiSoft.net
See Synchronization with PosiSoft.net for more information.
Click
Reading date/time and units are imported from the instrument. These parameters cannot be altered.
Individual readings cannot be deleted. Instead, select
The preview section displays a WYSIWYG (what you see is what you get) preview of the report. The report content is based on the selected batch(es) or Job and the selected Report Template.
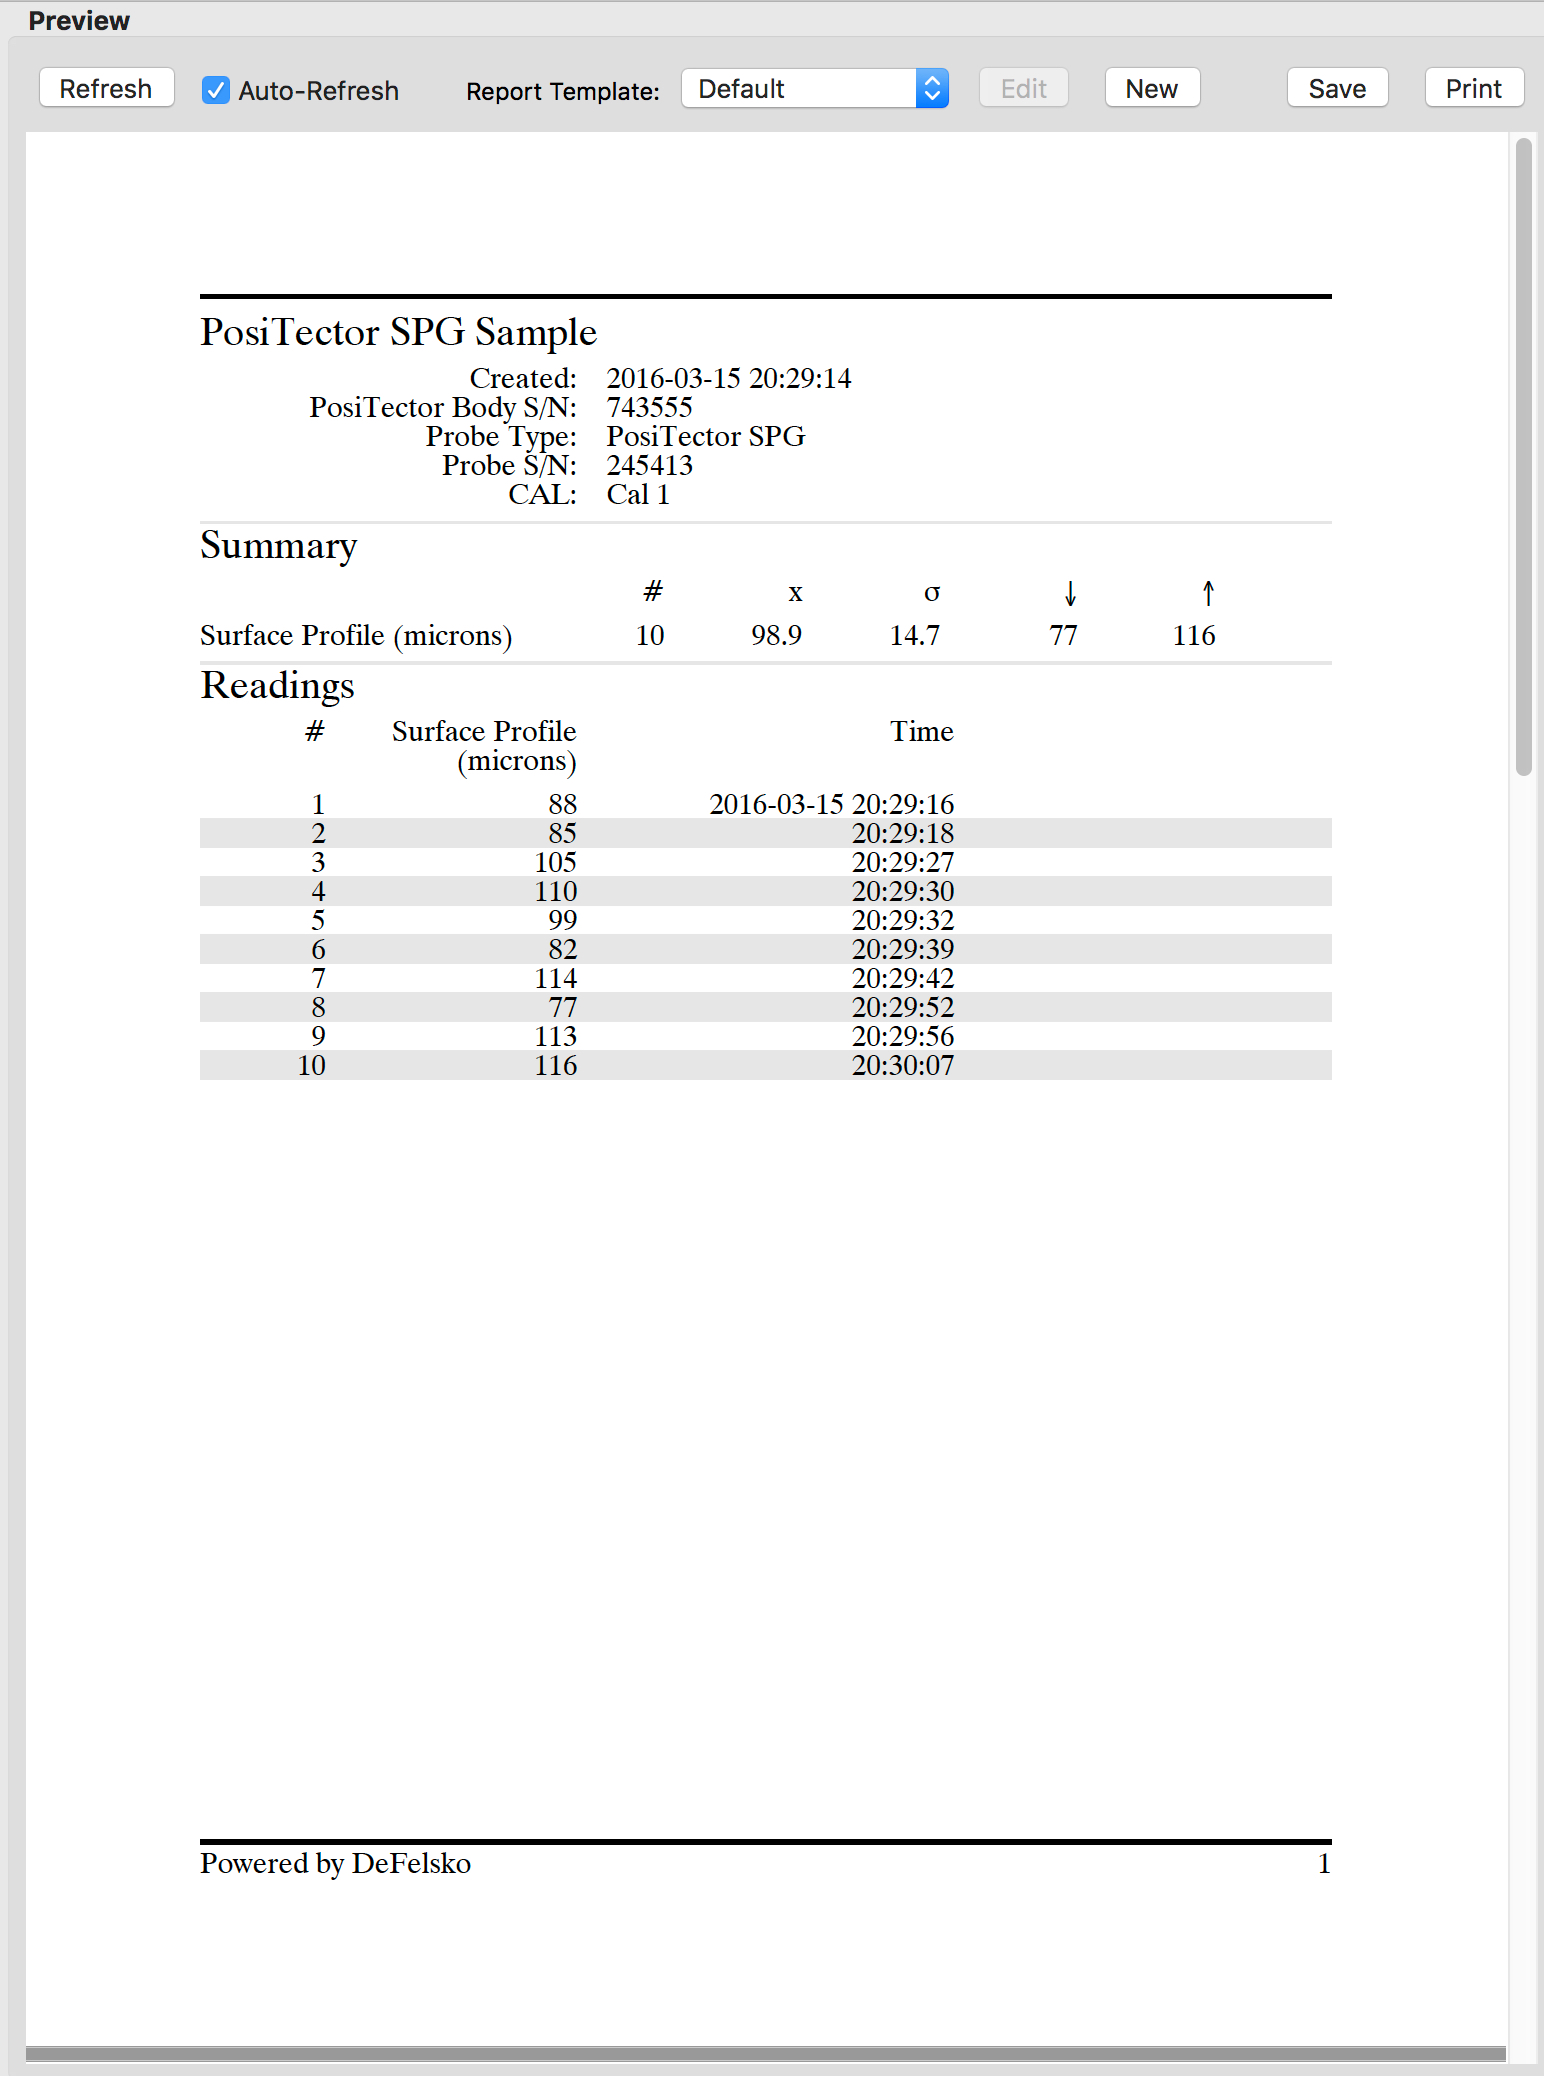
Preview Action Bar

By default, the Auto-Refresh feature is selected. Any saved changes to a Job, Batch, Reading or Report Template will automatically refresh in the preview report.
Jobs or Batches containing large amounts of data will take longer to refresh. A "Loading PDF" message will be displayed while the report is being refreshed. Unchecking the Auto-Refresh may be desirable for reports containing large amounts of measurement data.
Report Template - select from Default or custom user created report templates
save report as PDF. Select desired location, file name and click Save.
print the displayed report to a local or network attached printer
Creating Custom Report Templates
PosiSoft Desktop offers customizable reporting tools which allows the user to add pictures, notes, headers, cover pages/text, custom fields and more. Select from fonts installed on your computer, resize/realign images and text. Include/exclude information based on instrument type. Save your custom layouts as templates for future use.
Select New to create a customized report (recommended). Templates provide complete customization of the report including page size, headers, pictures, font type/size, cover pages and more.
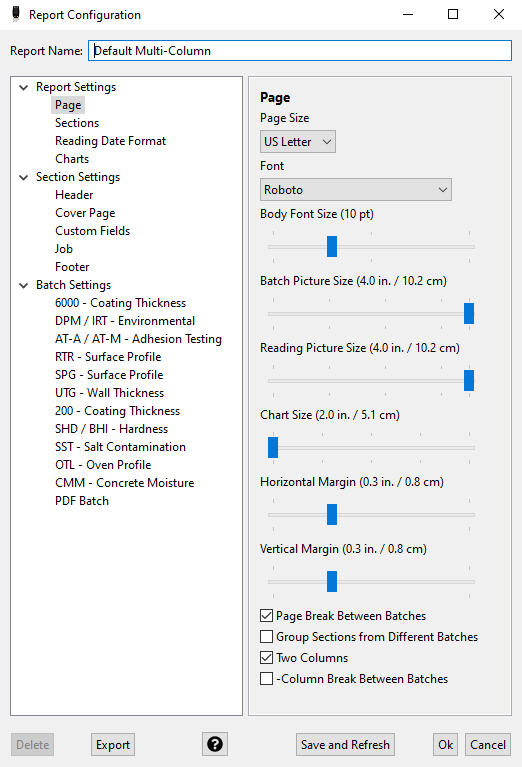
Report Name: Enter a meaningful name for the report template.
Page
|
|
Sections
|

|
|
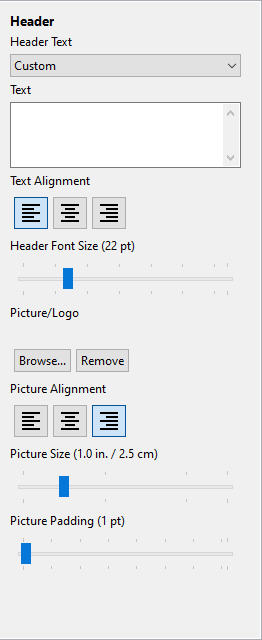
Header
|
 |
|
Footer
Note: The header and footer are displayed on all report pages. |
 |
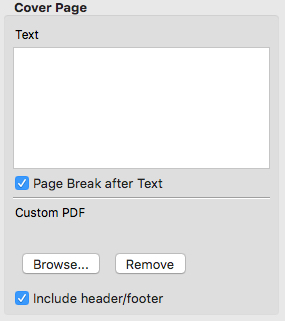
Cover Page
|
 |
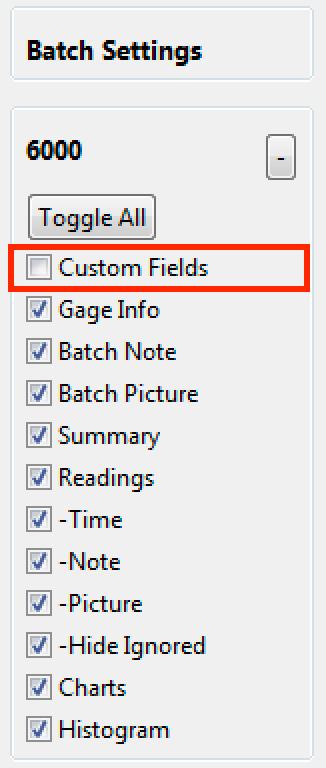
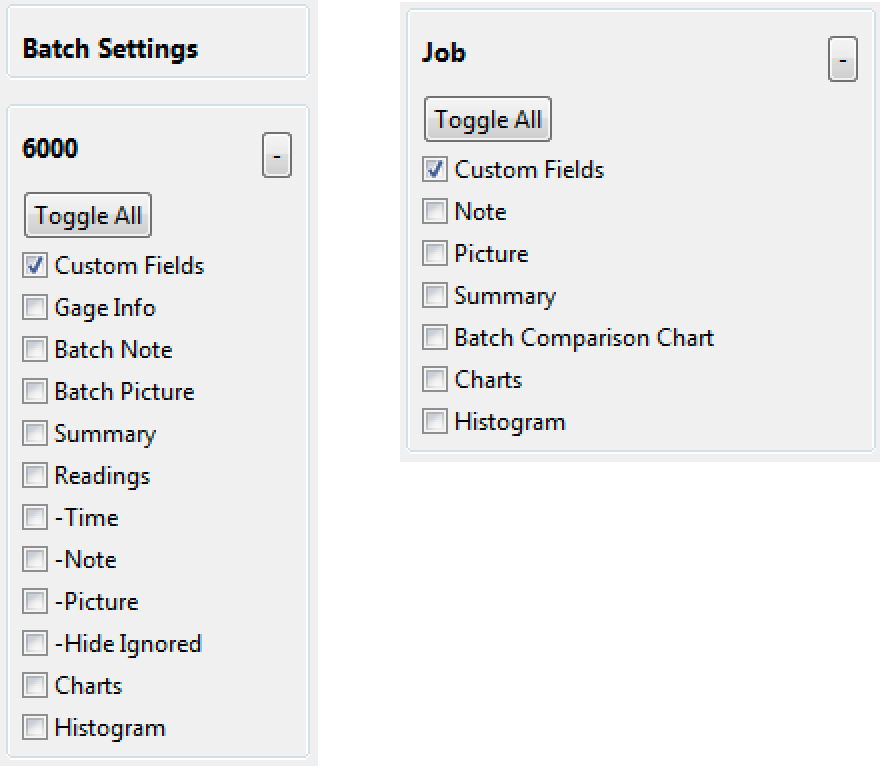
Custom Fields
|
 |
Job
|
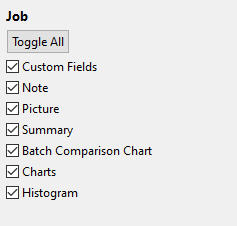 |
Report Detail (by gage/probe type)
|
 |
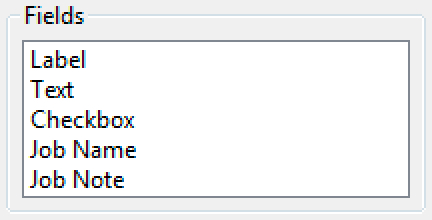
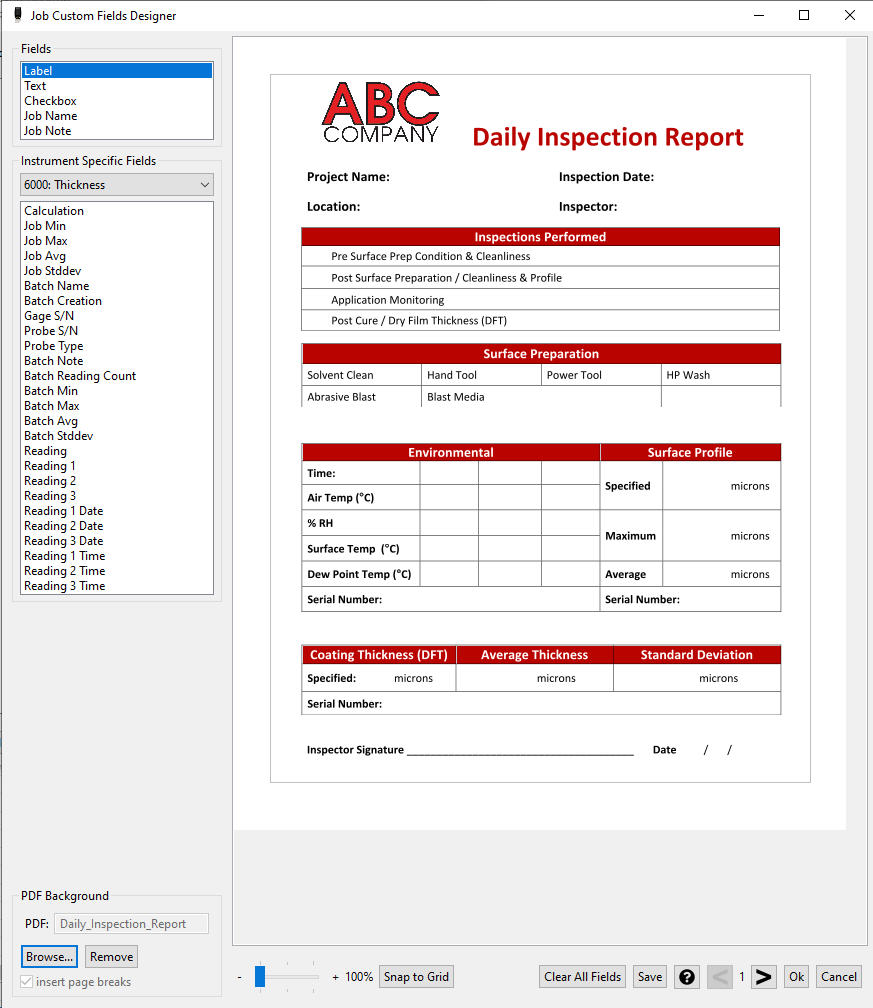
Custom Fields allow users to create
user 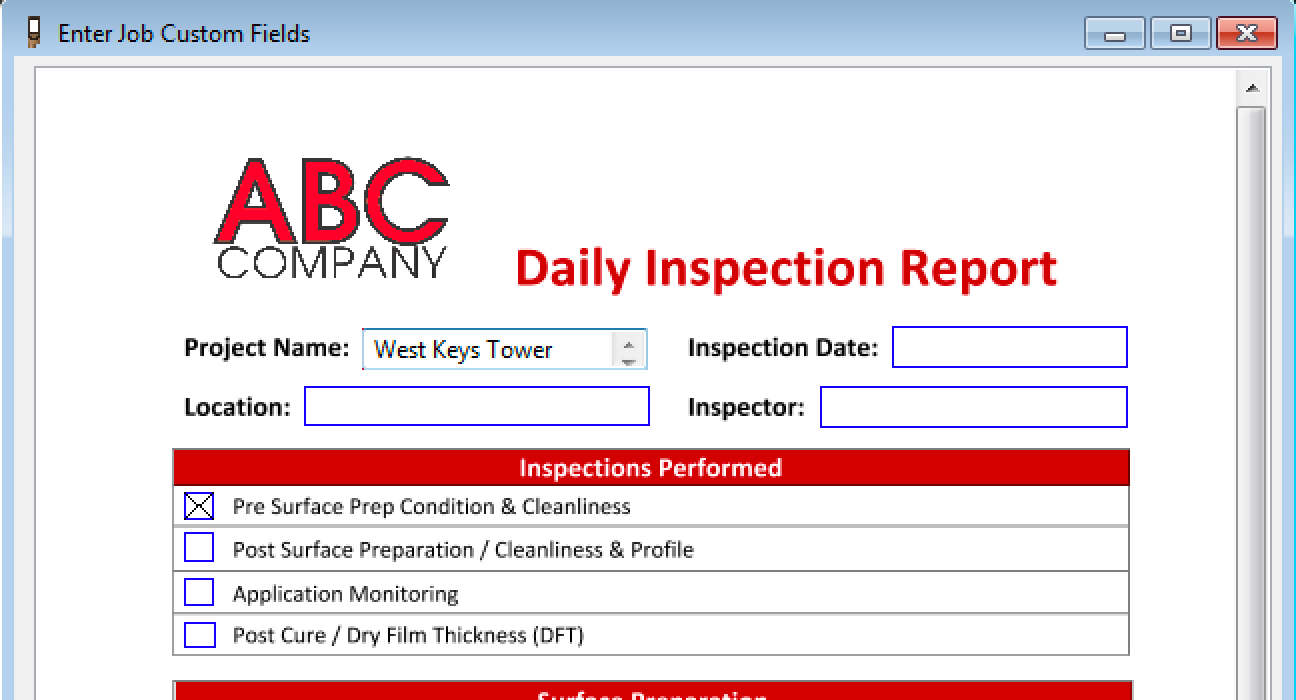 defined fields for use in Job
and Batch reports. Easily import existing PDF forms
and overlay custom fields for automatic population of measurement data
into existing inspection reports.
defined fields for use in Job
and Batch reports. Easily import existing PDF forms
and overlay custom fields for automatic population of measurement data
into existing inspection reports.
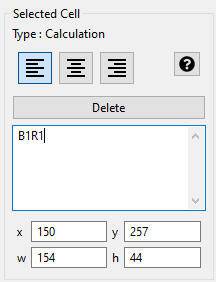
Custom Fields can be arranged as desired allowing the creation of a form. Existing inspection forms can be imported as a background and Custom Fields can be overlaid for automatic population of measurement data. Measurement data from a variety of instrument types can be included in a single user-created form.
Note: Custom Fields do not synchronize with web-based PosiSoft.net.
|


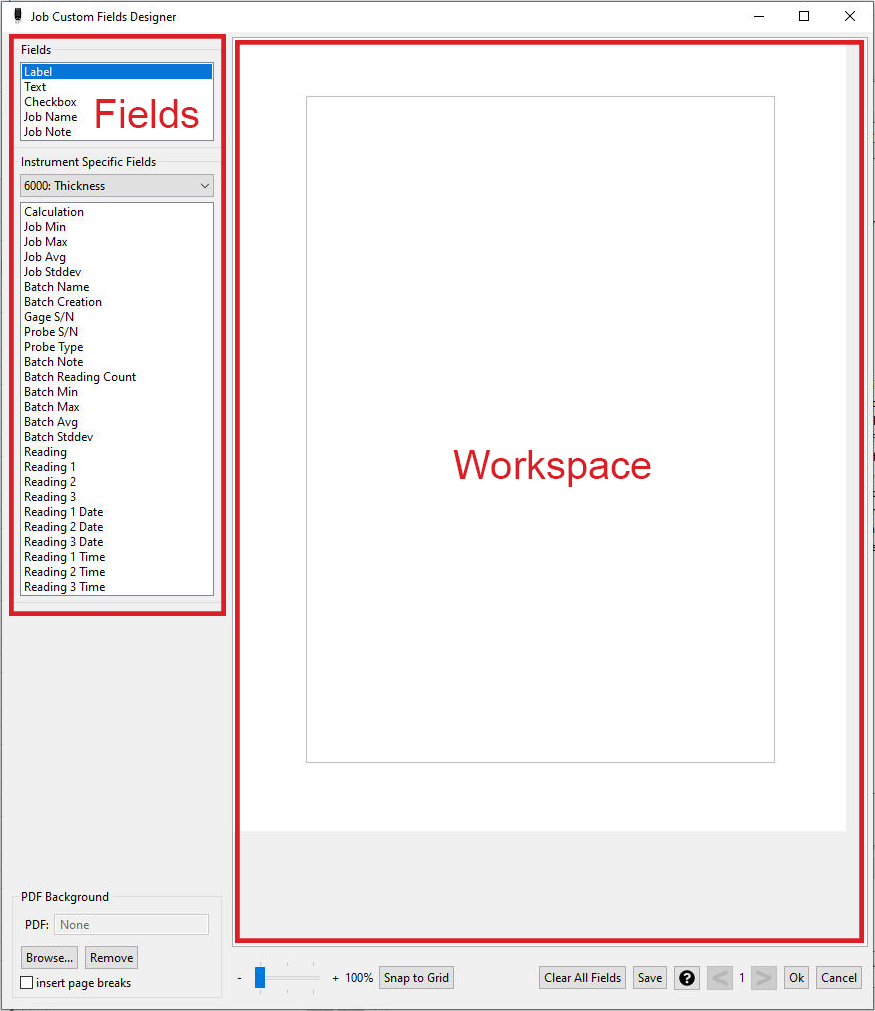
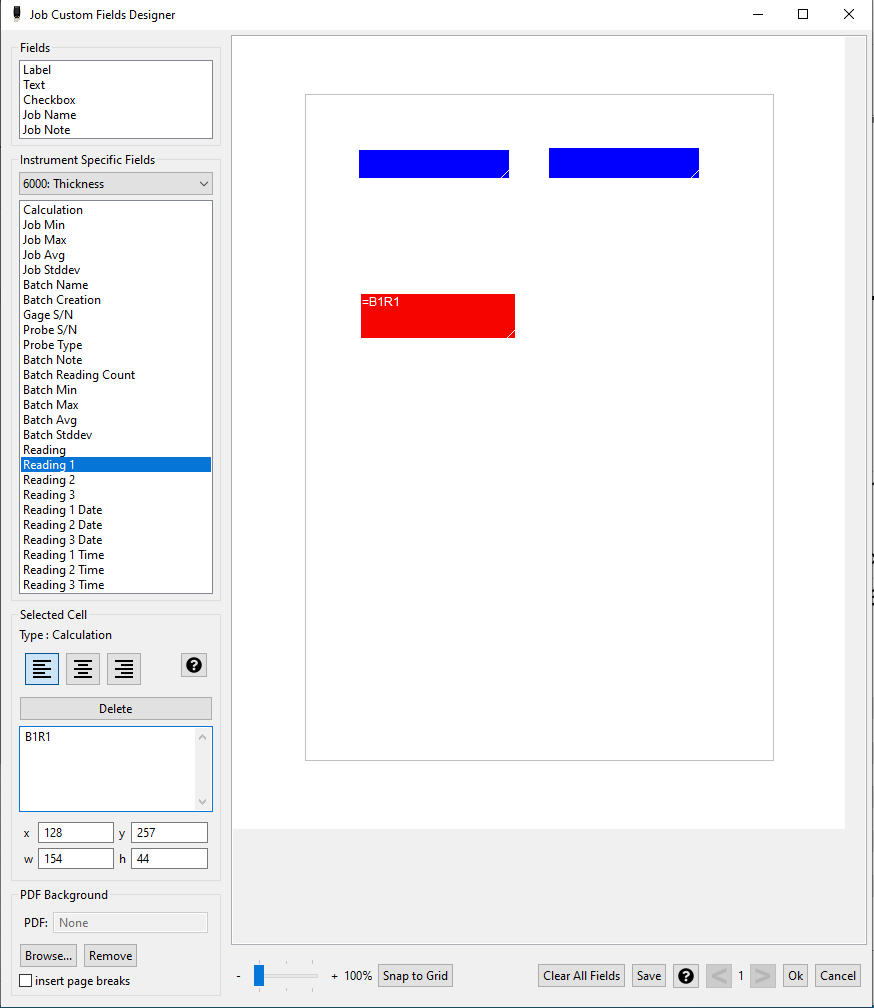
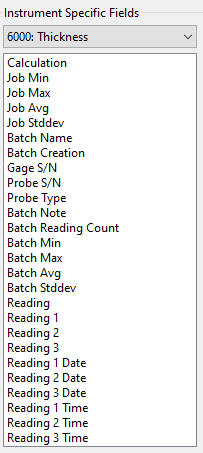 Instrument
Specific Fields
Instrument
Specific Fields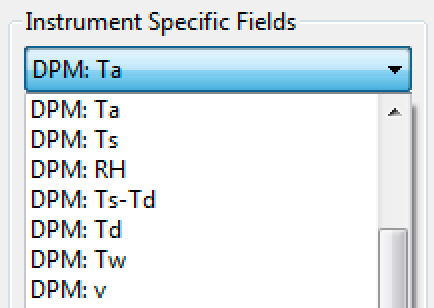
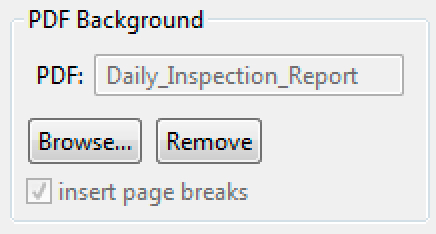 Add an existing
digital PDF or scanned form to the background. Custom
Fields can be overlaid to auto-populate the form.
Add an existing
digital PDF or scanned form to the background. Custom
Fields can be overlaid to auto-populate the form.


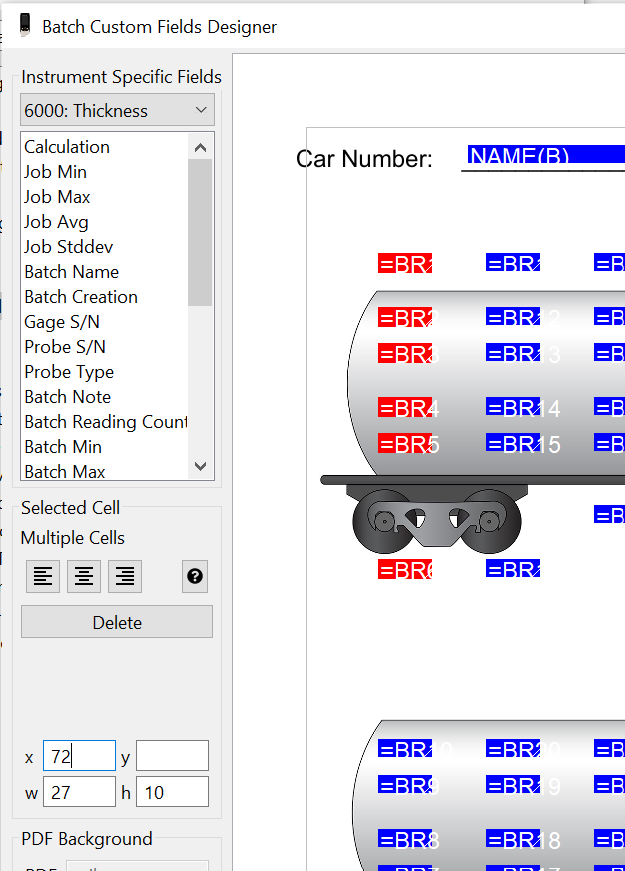
Create Prompted Batch Templates
Create pre-defined batch templates with image and text
prompts for use with PosiTector
Create New Prompted Batch Template
To create a new Prompted Batch Template, select New Prompted Batch Template in the File menu.
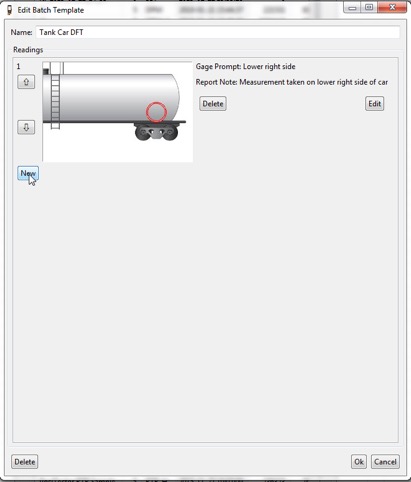
Enter a template Name then select New to create a prompted reading. Each new prompted batch using this template will use this name, followed by a number (i.e. Railcar 1, Railcar 2, etc.)
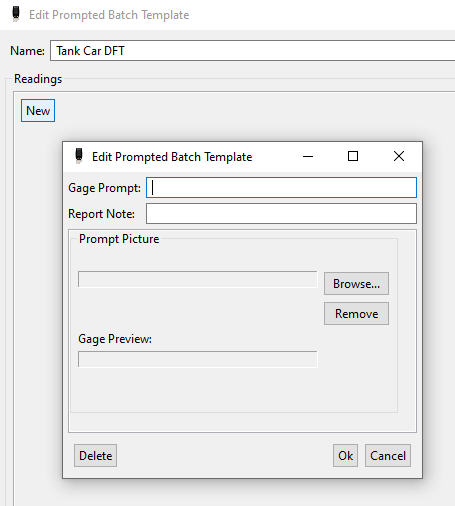
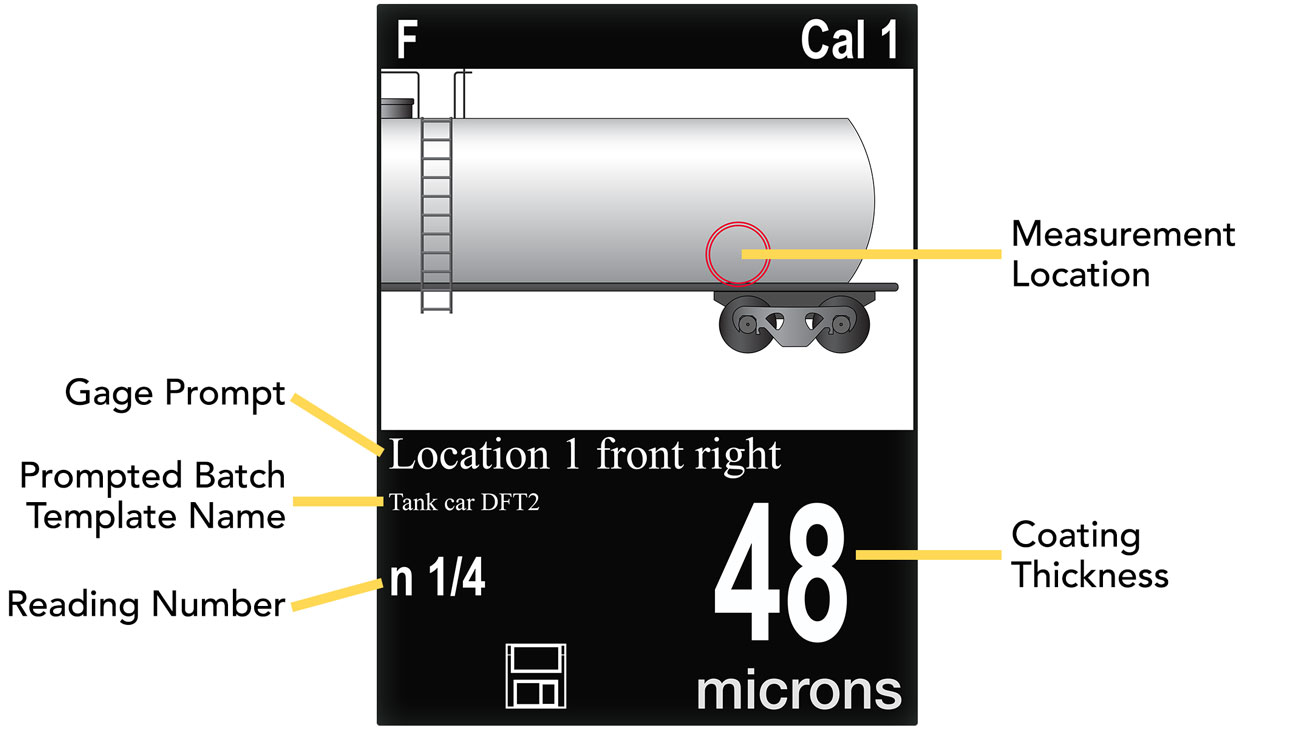
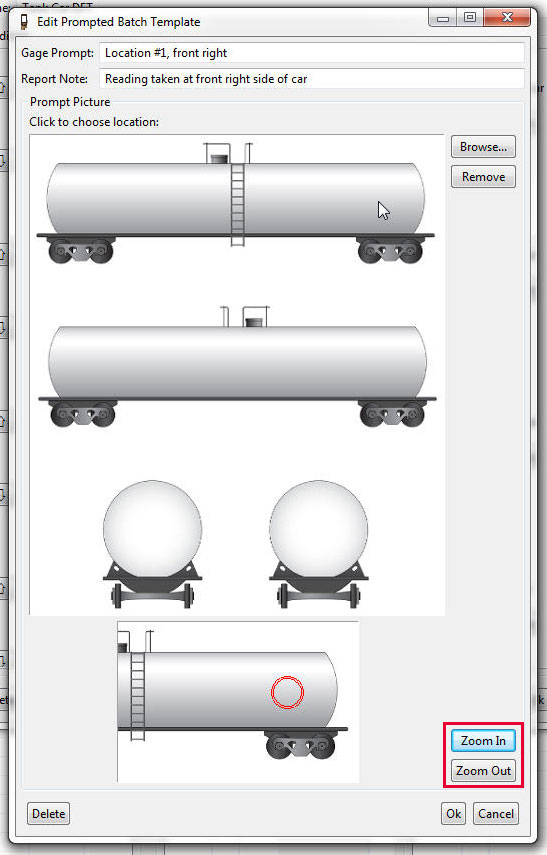
Gage Prompt: The Gage Prompt displays on the PosiTector 6000 screen, providing the user with information about the measurement location. The Gage Prompt does not appear on any reports.
Report Note: The Report Note will appear on the report to provide information pertaining to this reading location. The Report Note will not appear on the PosiTector 6000 screen.
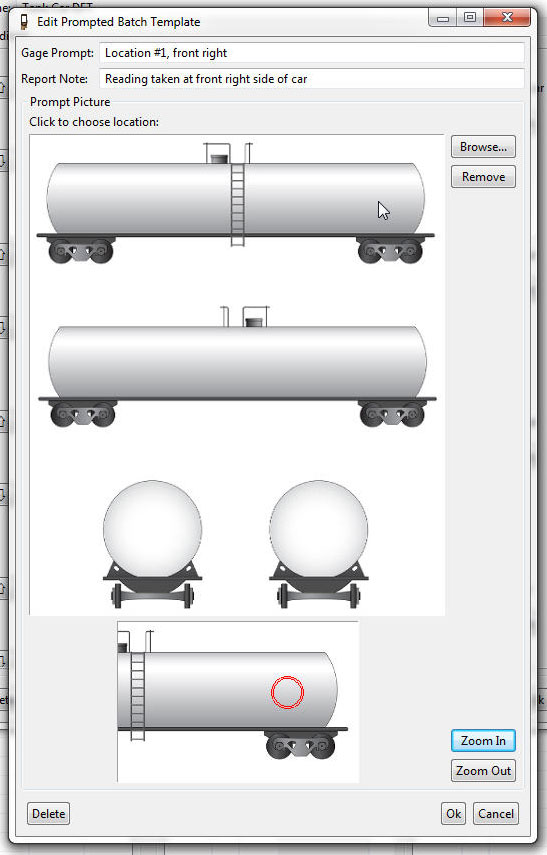
Browse: Choose Browse... to select a picture to associate with one or more reading locations. Multiple different pictures can be used in a single Prompted Batch Template. A new reading will always recall the last image in the Prompted Batch Template sequence. Supported files: GIF, JPEG, PNG.
Once an image has been selected, click the desired measurement location for the reading (top larger image). Select Ok once the desired measurement location is identified with the red circle.
Use the Zoom In and Zoom Out buttons to change the orientation (bottom image). The image at the bottom of the Edit Prompted Batch Template screen represents how the image will appear on the PosiTector 6000 screen.
Select New to create the next prompted reading location.
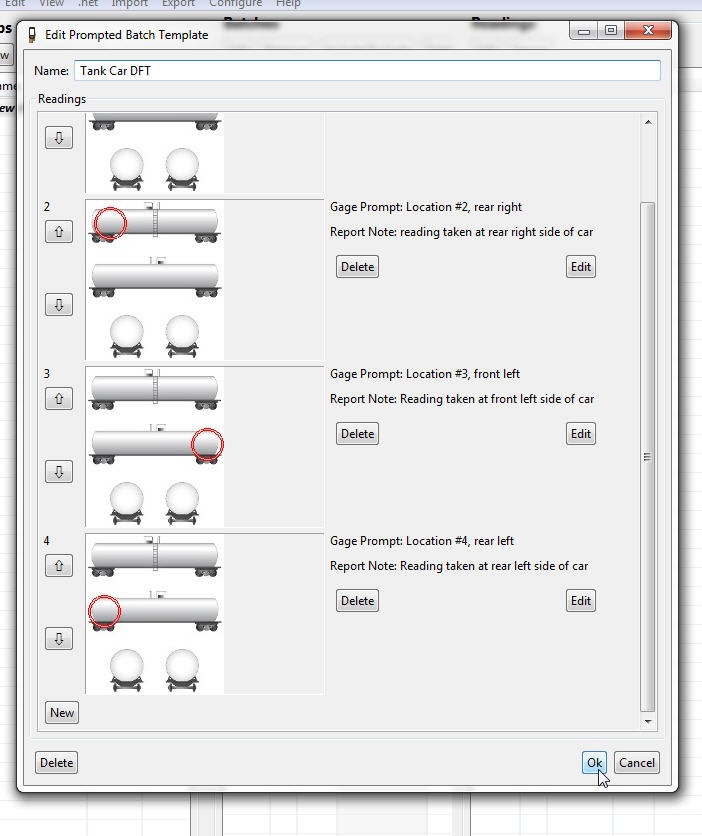
Repeat this process to create all prompted readings in your Prompted Batch Template, then select Ok. The Prompted Batch Template is saved and ready for Export to a PosiTector 6000 Advanced coating thickness gage.
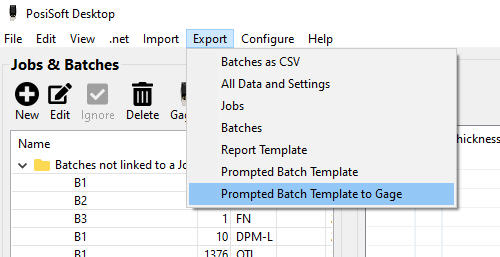
Export a Prompted Batch Template to the Gage
Select Prompted Batch Template to Gage from the Export menu to transfer the Prompted Batch Template to the connected PosiTector 6000 gage.
Edit a Prompted Batch Template
To edit a previously created Prompted Batch Template, select Prompted Batch Template from the Edit menu. Choose the desired Batch Template to edit and select Ok.
Delete a Prompted Batch Template
To delete a Prompted Batch Template, select the Delete button in the Edit Prompted Batch Template window.
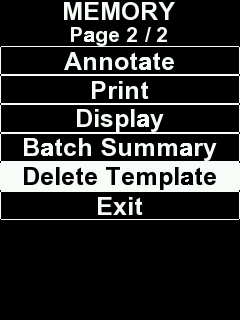
To delete a Prompted Batch Template from a PosiTector 6000 gage, select Delete Template in the Memory menu.
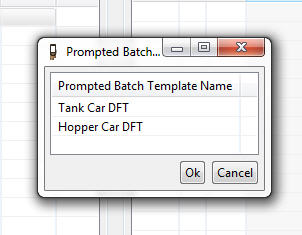
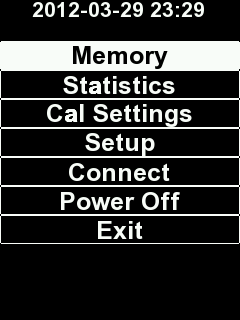
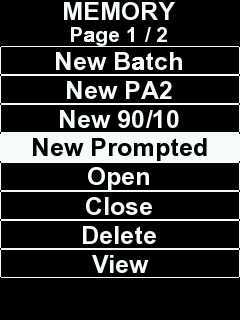
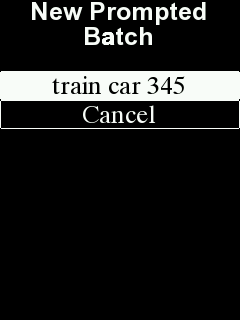
To open a new Prompted Batch Template exported from PosiSoft Desktop to your PosiTector 6000, access the menu by pressing the
button then select Memory and New Prompted to view and select from available Prompted Batch Templates.
Each batch created using a Prompted Batch Template will contain the template name and append a number indicating order created (i.e. TemplateBatch1, TemplateBatch2, etc.)
To exit a Prompted Batch, select Close from within the Memory menu.
Prompted Batch Templates are compatible with PosiTector
Advanced gages (serial number 784,000+) with a connected PosiTector
6000 coating thickness probe. Prompted
Batch Templates do not work with other PosiTector
probes.
PosiTest OTL Batch Editor (Oven Temperature Logger)
The PosiTest OTL Batch Editor allows users to add batch annotations, label individual channels, set threshold temperatures, compare datasets to reference batches and more.
To open a PosiTest OTL Batch, double click on it or select it and click the Edit button. Opening a PosiTest OTL Batch will display the Editor. Edits made within the Batch Editor are reflected on the PDF report. To save the edited Batch select OK.
The PosiTest OTL Batch Editor is divided into three sections.

The Batch section allows a user to rename the opened batch, flag the Batch as a Reference Batch, add notes and pictures, select threshold temperatures, edit Channel labels and select active channels.
Batch Name
Rename the currently opened Batch to something meaningful.
Reference Batch
When checked
, the currently opened Batch is identified as a Reference Batch and will be available for comparison within other Batches. All Reference Batches are displayed within the Reference Batch section.
Note
Add descriptive text for the selected Batch.
Threshold Temperature
PosiSoft calculates the Time Above Temperature for up to three user defined Threshold Temperatures. Enter the Threshold Temperatures for the current Batch in this section. Time Above statistics are calculated and displayed beside each Channel.
Channels
Individual Channels can be enabled
from the chart and the report. Each Channel Label can be renamed for easier identification of their corresponding sensor.

The Chart section displays temperature over time for each selected Channel for the selected Batch and Reference Batch (if selected). Individual traces can be highlighted with the cursor. Zoom in on a specific area by clicking and dragging the pointer on the chart. The Chart also displays the entered Threshold Temperatures.

This section is used to select a Reference Batch, identify active Reference Channels and inclusion of a Start At Temperature.
A comparison can be made to previously logged PosiTest OTL batches if those batches have been identified as a Reference Batch. A check box located under the Batch Name in the Batch section identifies a Batch as a Reference Batch.

All Reference Batches appear in the Reference Batch section. Simply select a Batch to use as a Reference Batch. By default, No Reference is selected.

Individual Reference Channels can be enabled or disabled
from the Reference Batch comparison.

To align the Batch with a Reference Batch, enter the Start At Temperature and corresponding Channel from the Batch and Reference Batch.

Typically, this would be an Air Temperature probe from both batches. When aligned, the logged results from the batch and reference batch channels are shifted in time. The Start At Temperature intersects with these channels and becomes time 00:00.
To save the edited Batch select OK. A PDF is automatically generated using the selected report template.
Surface Data File (SDF) Viewer - PosiTector RTR 3D and PosiTector RTR P Advanced models only
Surface Data Files (SDF) generated using PosiTector RTR 3D Advanced instruments can be imported for analysis and reporting.
To view an SDF, double-click the desired SDF from within the Batches view.
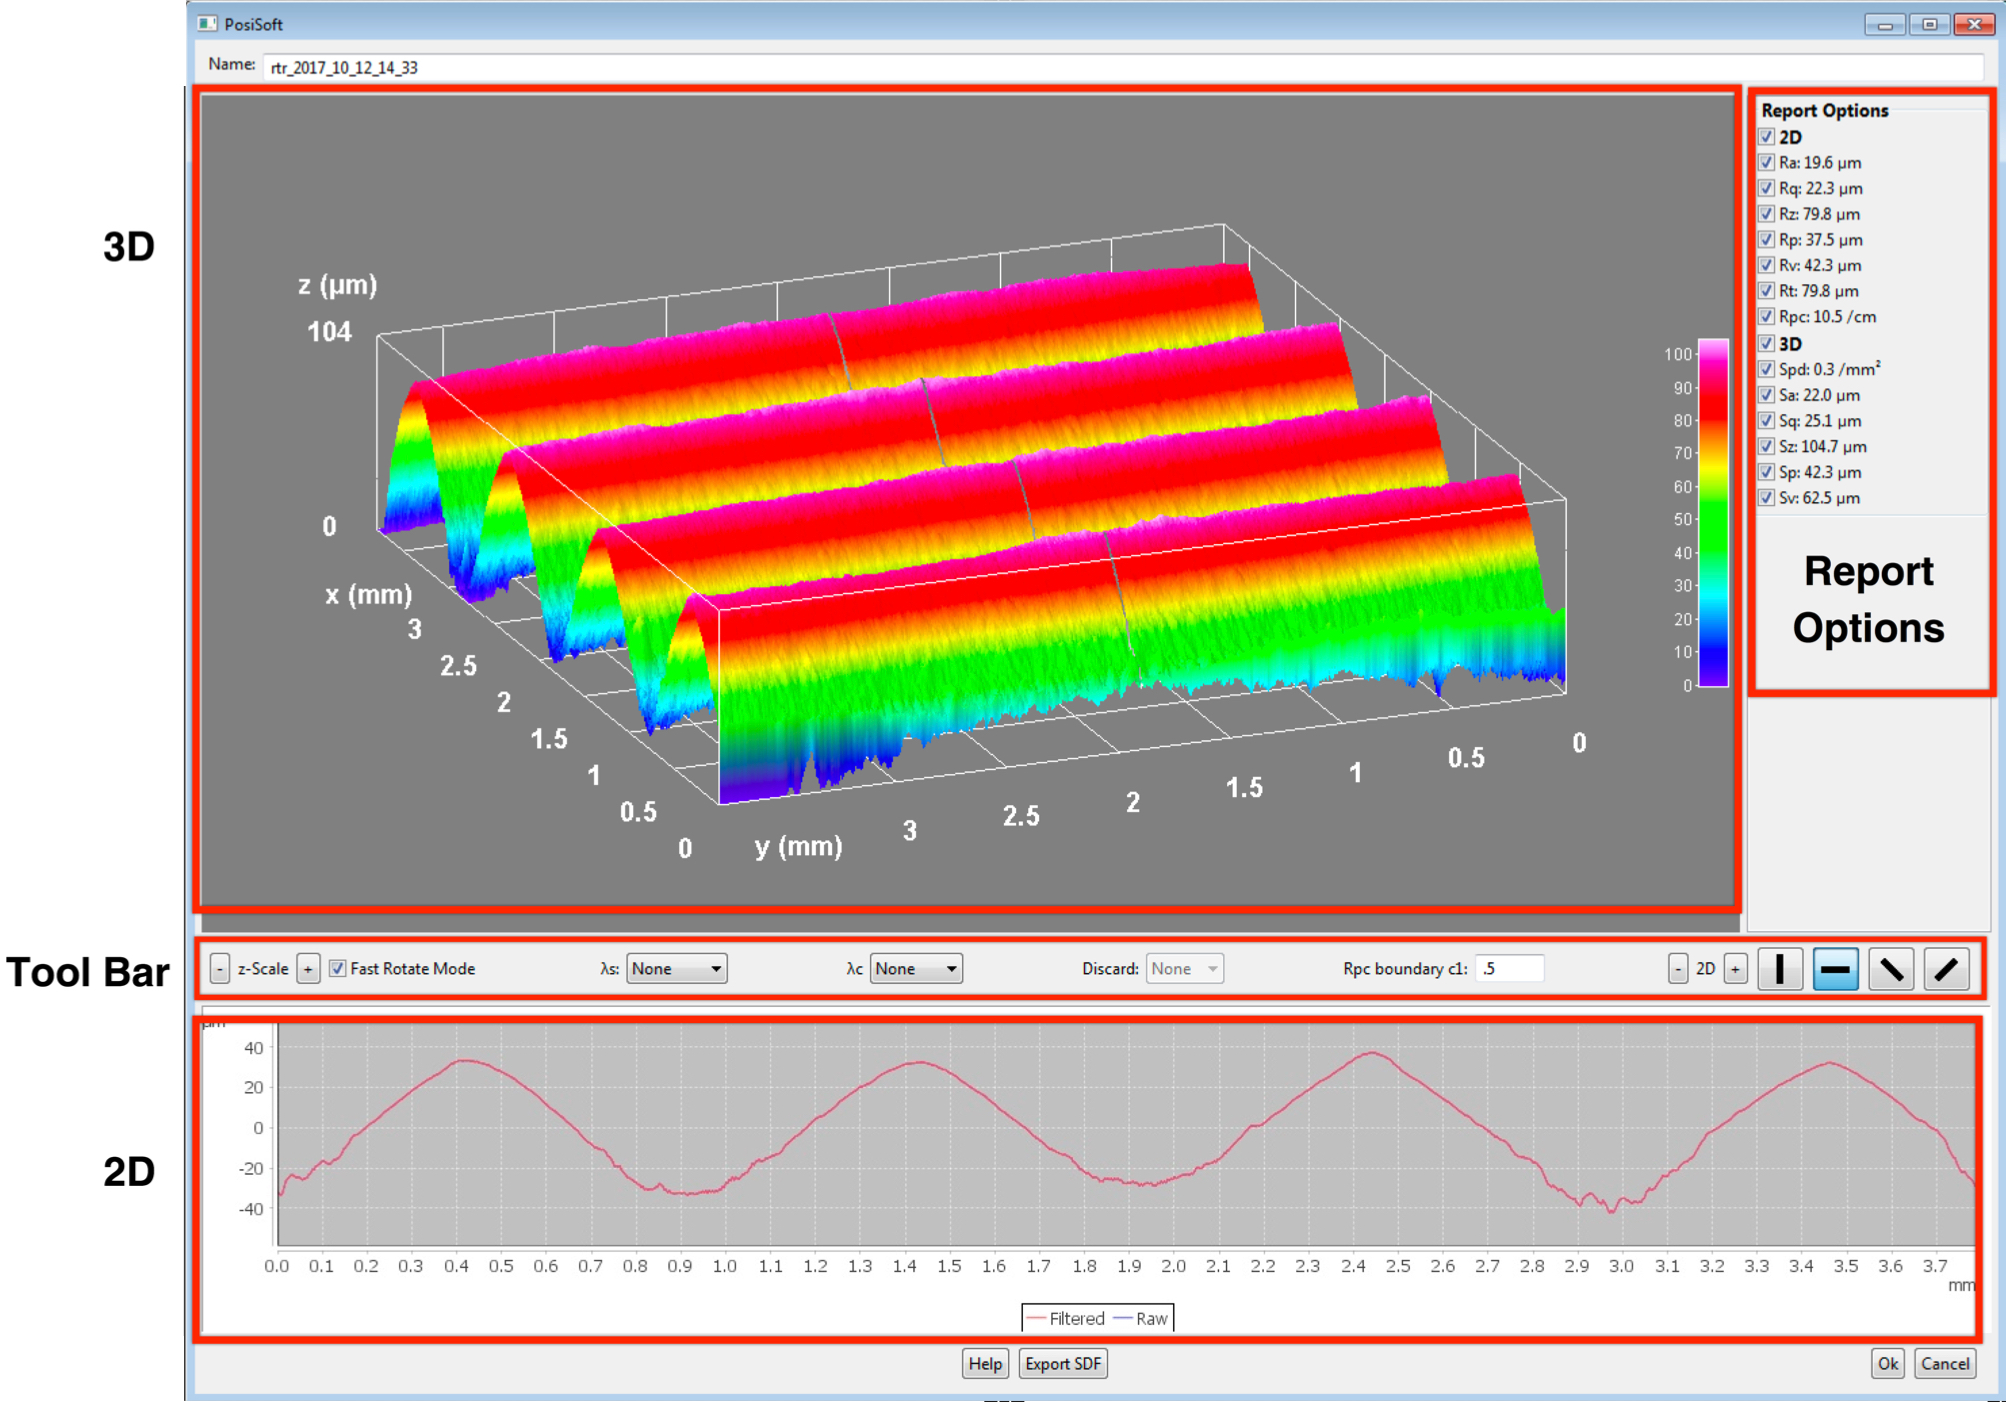
3D View
Rotate/Resize 3D SDF
Rotate the 3D SDF by clicking and dragging the image with your mouse. Use the scroll button to resize the 3D image.
z-Scale
Use the
and
buttons to adjust the displayed z-scale.
Fast Rotate Mode
Fast Rotate Mode (checked by default) reduces the lag (slow movement) which typically occurs during the rotation of 3D images. Uncheck to disable this feature.
To optimize the analysis for a specific application, filters may be applied to the raw image to remove undesirable profile characteristics prior to calculating the 2D and 3D parameters.
The short wavelength (λs) Gaussian filter attenuates features that have a wavelength shorter than the selected size. The long wavelength cutoff (λc) Gaussian filter attenuates features that have a longer wavelength than the selected size.
λs The following short wavelength filters (λs) are available:
None
0.008mm
0.025mm
0.080mmλc The following long wavelength cutoff filters (λc) are available:
None
0.08mm
0.25mm
0.8mm
2.5mmDiscard
A side effect of the long wavelength cutoff (λc) filter is that values near the edge of the evaluation length or area are skewed. To prevent these skewed values from affecting 2D and 3D parameter calculations, the values near the edges of the evaluation are discarded. The Discard length is calculated from the long wavelength cutoff (λc) selected.The following discard selections are available:
none
½
1
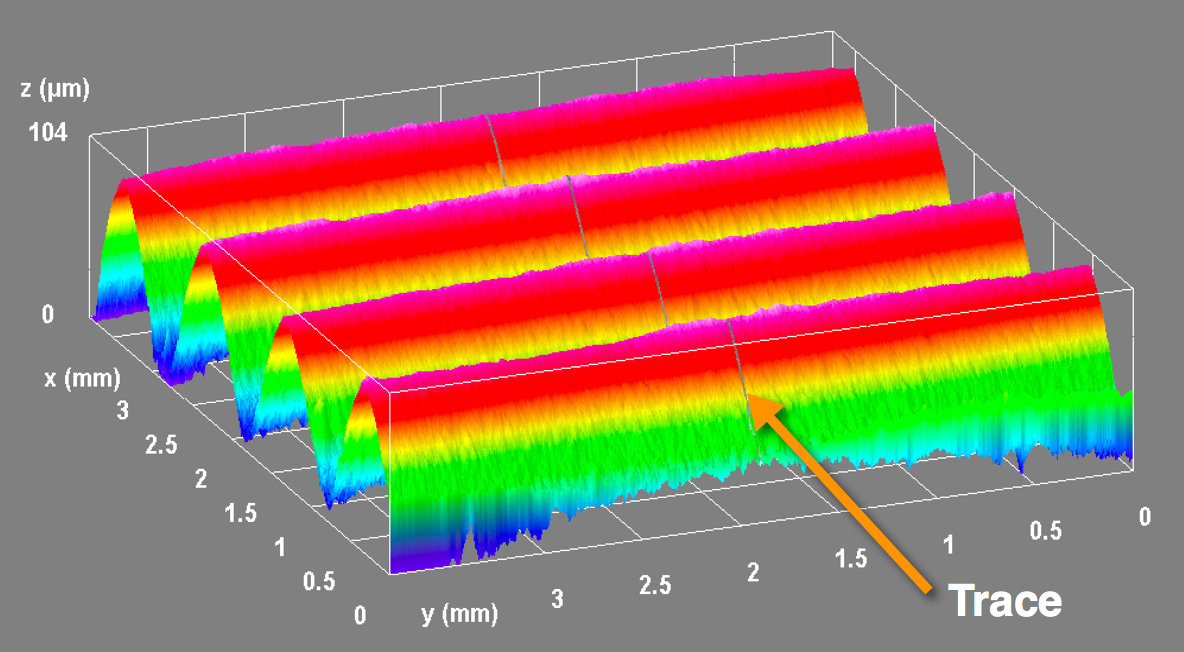
2D parameters are calculated from a virtual ‘trace’ across the image area.
By default, this trace is in the Horizontal X direction, parallel to the long axis of the replica tape.
2D representation of the trace
This orientation can be changed if desired:
Horizontal X
Vertical Y
Diagonal XY
Diagonal YX
Use the

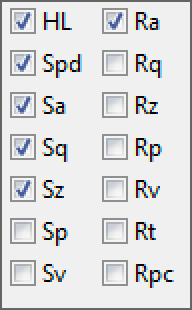
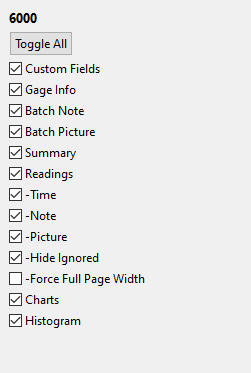
All 2D and 3D parameters are included in reports by default. Uncheck parameters to exclude them from generated reports.
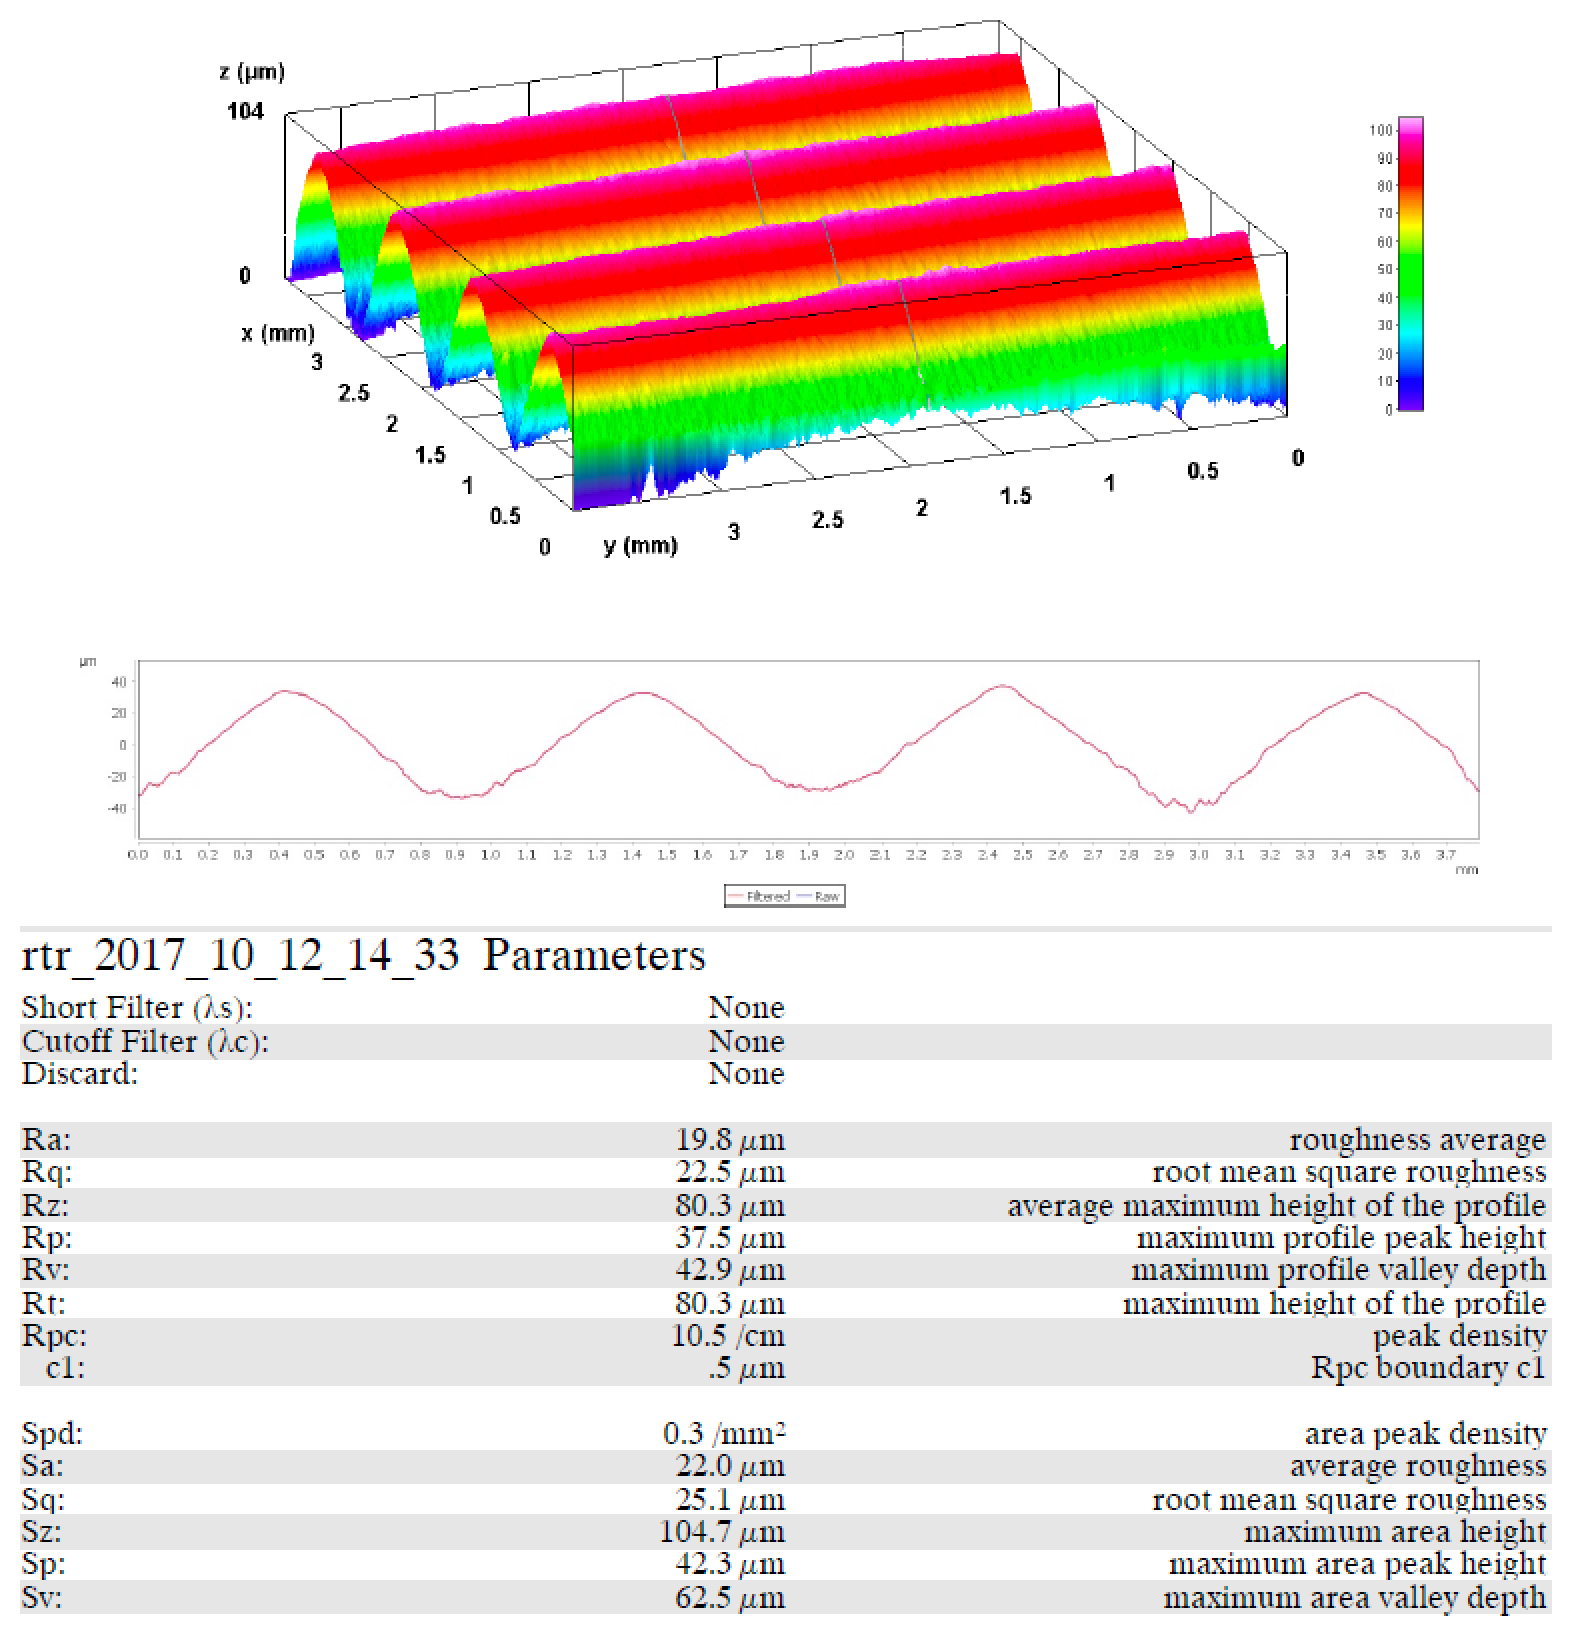
2D Parameters
2D parameters are calculated from a virtual 'trace' across the image area. When the Orientation is set to Horizontal X or Vertical Y directions, the evaluation length is equal to 3.8mm, minus double the length of the selected discard filter. When the Orientation is set to Diagonal XY or Diagonal YX directions, the evaluation length is equal to 5.4mm, minus double the length of the selected discard filter.
2D - When checked (default), the 2D trace image is included in generated reports. Uncheck to exclude from reports.
Ra - Roughness average: arithmetic average of the absolute values of the profile height deviations within the evaluation length measured from the mean line
Rq - RMS roughness: root mean square average of the profile heights within the evaluation length measured from the mean line
Rz - Average maximum height of the profile: arithmetic average of the successive values of the maximum peak to deepest valley within each sampling interval calculated over the evaluation length. The length of the sampling interval is equal to the cutoff length λc and the number of sampling intervals is the number of whole cutoff lengths λc that can fit within the Evaluation Length.
Rp - Maximum profile peak height: the distance between the highest point of the profile and the mean line within the evaluation length
Rv - Maximum profile valley depth: the distance between the deepest valley and the mean line within the evaluation length
Rt - Total profile height: the distance between the highest peak and the deepest valley within the evaluation length
Rpc - Peak count: number of peaks per unit length within the evaluation length
Rpc Boundary C1 Peak count level: defines the boundary lines located equidistant above and below the profile mean line. A Peak is counted after the trace goes below the lower boundary line and above the upper boundary line. The default is 0.5 µm
3D Parameters
3D parameters are calculated across the image area. When calculating 3D parameters, an evaluation area is determined by removing an area around the outside edge of the image area equal to the width of the discard length.
3D - When checked (default), the 3D image is included in generated reports (same orientation as shown in SDF viewer). Uncheck to exclude from reports.
Spd - Areal peak density: the number of peaks per unit area
Sa - Average roughness: the arithmetic average of the absolute values of the measured height deviations from the mean surface taken within the evaluation area.
Sq - Root mean square roughness: the root mean square average of the measured height deviations from the mean surface taken within the evaluation area.
Sz - Maximum area peak-to-valley height: the vertical distance between the maximum peak height and the maximum valley depth. Commonly referred to as St.
Sp - Maximum area peak height: the maximum height in the evaluation area with respect to the mean surface.
Sv - Maximum valley depth: the absolute value of the minimum height in the evaluation area with respect to the mean surface.
The SDF file can be exported for use in other SDF compatible applications. The exported SDF can also be imported back into PosiSoft Desktop.
The import menu is used to get measurement data into PosiSoft Desktop. Select "Import" from the application menu.
from
Gage
Import Batches from a USB or WiFi connected PosiTector or
PosiTest instrument.
1. Connect the gage to a computer using the supplied USB cable or to a common WiFi network.
Note: PosiTector Standard/Advanced & PosiTest AT-A with color touch display: Ensure "USB Drive" is enabled (checked) within the gage "Connect" menu
2. When successfully connected, a "Connected Gage" section will appear as shown below. Select "Import" to copy batches from the gage into PosiSoft. Alternatively, select "Import > from Gage" and select your connected gage to initiate the transfer. Imported batches will display within the selected batch or in the Batches not linked to a Job section.
The time it takes for import will depend on the amount of data stored on the gage. Imports generally take no longer than a few seconds.Batches are not erased from the gage memory during import. They remain on the gage until they have been deleted or a gage reset is performed.
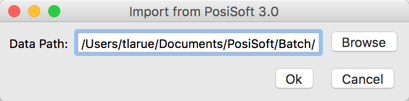
from
PosiSoft 3.0
Import pre-existing batches that were originally downloaded
using PosiSoft 3.0
When selected, the following Import from PosiSoft 3.0 window will display.
The default PosiSoft 3.0 Data Path is already populated. If this is incorrect, select Browse and navigate to the location where your PosiSoft 3.0 data is stored. Select Open to import the data.
from
PosiTector App
Import batches that were exported from the PosiTector App
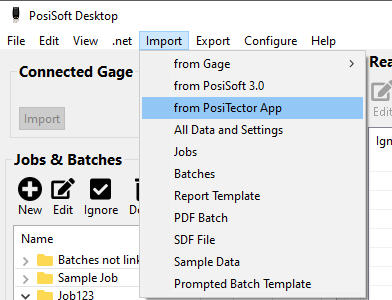
Navigate to the location where the exported .db file has been stored. Select the file and click Open to import the data.
Provides a complete Import of all Jobs, measurement data (notes, images), report settings, templates, and batch templates. Ideal when transferring information from another computer.
IMPORTANT NOTE: Importing All Data and Settings will overwrite all current batches, report templates and settings. This action is permanent and cannot be undone. If you have existing batches you wish to save, Export them prior to performing this action.
Import Jobs previously Exported from PosiSoft Desktop. If identical Jobs already exist, PosiSoft Desktop will not overwrite them and only import changes.
Import batches previously Exported from PosiSoft Desktop. If identical batches already exist, PosiSoft Desktop will not overwrite them and only import changes.
Import report templates previously Exported from PosiSoft Desktop. Templates with the same name will not be overwritten and will be duplicated in the Report Template drop down list.
Import a PDF document as a batch.
Ideal for including measurement data from unsupported or non-digital instruments such as PosiTest mechanical coating thickness gage, holiday (porosity) detector, sling psychrometer or Tooke gage.
Imported PDF documents will be displayed within the Batches section and can be included/excluded from reports. The batch name is based on the PDF file name. Batch date/time is populated with the PDF creation date. PDF Batches cannot be edited within PosiSoft Desktop.
PDF Batches can be excluded from Job reports by selecting the included/exclude toggle button.
Import an SDF (Surface Data File) file (PosiTector RTR 3D Advanced instruments only). Imported SDF files will appear in the Batch list.
PosiSoft Desktop supports SDF files that were generated from PosiTector
RTR 3D Advanced instruments only.
To import a Prompted Batch Template previously created in PosiSoft Desktop, select Prompted Batch Template in the Import Menu.
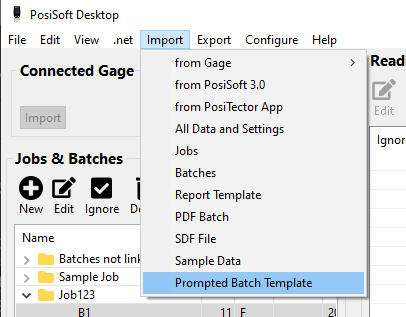
Navigate to the location where the exported .db file has been stored. Select the file and click Open to import the template.
The Prompted Batch Template will now be available within the Prompted Batch Template list. To view the Prompted Batch Template list select Prompted Batch Templates from the Edit menu.
Export single/multiple batches to a comma separated values (CSV) file. This file can be opened in any compatible application including spreadsheets and databases. This is an ideal solution for including measurement data in your own custom reports that are generated outside of PosiSoft Desktop.
Selecting Batches for CSV Export
Select desired batches in the "All Batches" table (hold the Shift key to select multiple batches).
Press the
To remove Batches from the "Selected Batches" list, highlight them and press the
Press the
.
Batches
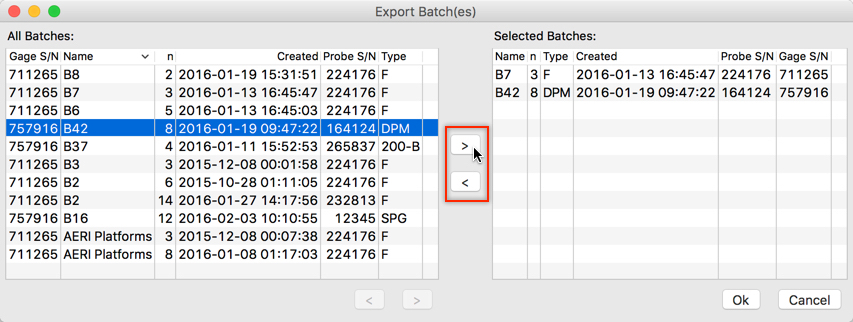
Export individual/multiple batches from PosiSoft Desktop. The exported backup file can only be opened in PosiSoft Desktop.
Select desired batches in the "All Batches" table (hold the Shift key to select multiple batches).
Press the
To remove Batches from the "Selected Batches" list, highlight them and press the
Press the
Provides a complete Export of all Jobs, measurement data (notes, images), report settings,templates, and batch templates. Ideal for performing periodic backups of your PosiSoft data or to transfer all PosiSoft data for use on another computer.
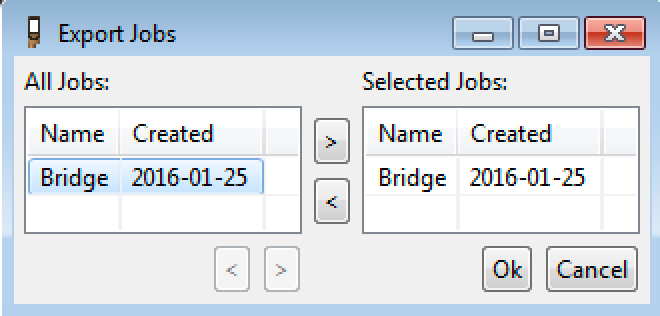
Export Jobs to share with other installations of PosiSoft Desktop. Select Jobs to export in the All Jobs table (hold the Shift key to select multiple jobs) and then press Ok.
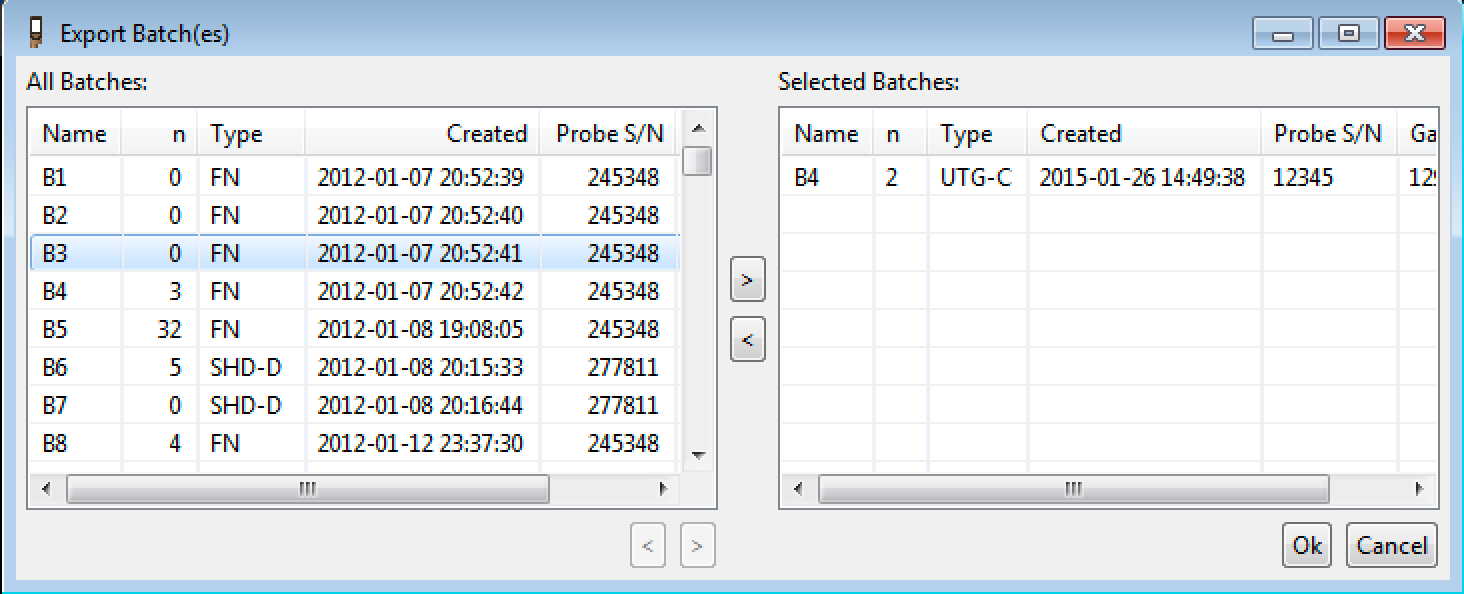
Export Batches to share with other installations of PosiSoft Desktop. Select Batches to export in the All Jobs table (hold the Shift key to select multiple batches) and then press Ok.
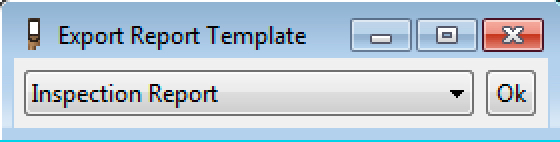
Templates are stored locally and can sync with posisoft.net. They may be exported to share with other installations of PosiSoft Desktop. Select Report Template to export in the Export Report Template drop-down box and then select Ok.
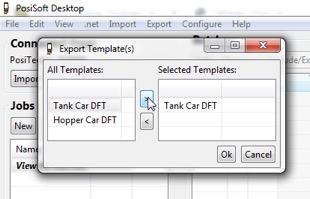
Export Prompted Batch Templates to share with other installations (users) of PosiSoft Desktop.
With the PosiTector 6000 connected to PosiSoft Desktop and powered on, select desired Prompted Batch Templates to export in the All Templates table (hold the Shift key to select multiple batches), select
To remove templates from the Selected Batches list, highlight them and press the
Prompted Batch Template to Gage
Export Prompted Batch Templates to your PosiTector Advanced gage.
Prompted Batch Templates is compatible with PosiTector Advanced gages (serial number 784,000+) with a connected PosiTector 6000 coating thickness probe. Prompted Batch Templates do not work with other PosiTector probes.
PosiTector DPM Monitor feature allows continuous monitoring of one or more dew point meters in a centralized location. Graphs allow you to spot climatic trends and cycles quickly.
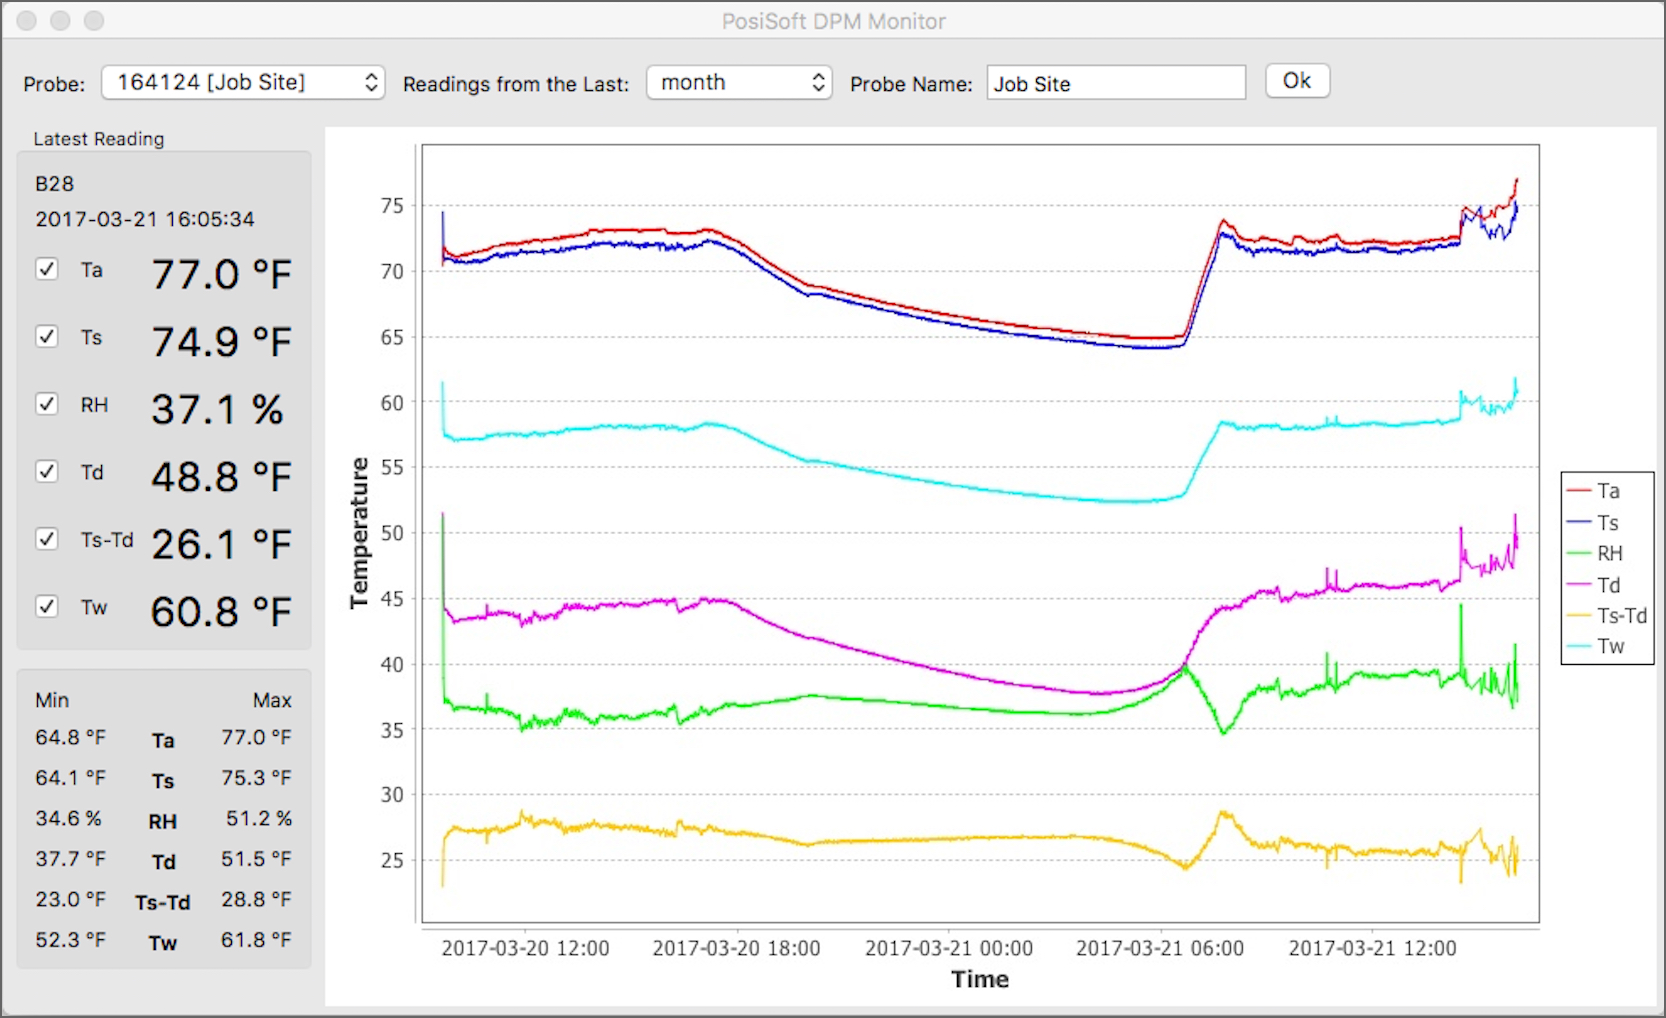
The PosiTector DPM Monitor pulls data from PosiSoft.net once every minute.
Probe Name
Assign a name associated with a specific probe (IE. DeFelsko Office)
Time period
Select a time frame to view
Charting
Select which parameters are included in the chart using check boxes
Min/Max
Scroll over a Min or Max value and the pop-up tool will display the time at which the value was recorded
PosiTector DPM gages must be set up to synchronize datasets with PosiSoft.net (internet connection required). For best results, Auto Sync .net should be enabled in the gage.
If the PosiTector DPM Monitor is not showing your recently recorded readings, check to ensure that the time is properly set on your PosiTector gage.
PosiSoft Desktop allows PosiTector and PosiTest AT-A instruments to communicate with our online update server to ensure they are kept up-to-date with the latest features. When connected via USB, select Gage -> Updates from the instruments menu. See Gage Software Updates for more information.
PosiSoft Desktop replaces the need for the legacy PosiSoft Desktop Manager utility.
Multi-lingual support (English, Spanish, Chinese, French, German, Japanese and Korean). Once your language preference has been selected, PosiSoft Desktop will automatically close and reopen.
Supports Windows 7/8/10 operating systems
PosiSoft™ Desktop for Macintosh supports OSX
Supports OSX 10.7 and greater
This DeFelsko Product includes software code developed by third parties, including code subject to the the GNU Lesser General Public License. All included libraries and licenses for these libraries are included in the libs directory under the application's installation directory (on Windows) or in the Java/posisoft_lib directory in the application bundle (on OS X). As applicable, the terms of the LGPL and information on obtaining access to the LGPL code for this product are available at www.defelsko.com/terms

